If you’re using Open dental in your practice, I’m sharing my top efficiency hacks and features when it comes to Open Dental treatment plans.
These aren’t theoretical tips—they’re battle-tested shortcuts that have saved me and my team thousands of hours and helped us maximize profitability.
Forget the basic tutorials. I’m sharing my daily workflow with Open Dental treatment plans learned from a decade+ of deep use and client feedback.
For the past twelve years, I’ve lived and breathed Open Dental software, building my entire practice from scratch using this platform.
But I didn’t stop at just using it—I learned it to the point where I developed my own software layer on top of Open Dental called Teamio, which now helps hundreds of dental practices optimize their operations and keeps them on the pulse of their financial performance.
This isn’t meant to be a full blown step by step tutorial on how to use the Open Dental Chart module or the Treatment Plan Module in Open Dental.
But instead, I’d like to share the exact workflow we have in my own practice.
These are the same things that we bring up during our Teamio training calls with our client offices.
And every time I do this, I find that they’re blown away by the things their front office team or even the doctors didn’t know.
That’s what we’re going to get into today for part I of this two-part series on Open Dental Treatment plans.
To make it even easier for your team, I’ve included a downloadable free pdf guide – it’s a quick practical playbook giving you actionable steps to bring efficiency into your everyday treatment planning workflow.
Alright, so this is what we’re going to cover:
- Best practices for efficiency for your everyday workflow – specifically when you’re seeing patients for treatment planning
- These are things you can do to speed up your workflow as you’re entering treatment into the patient’s chart
- We’ll get into the things that will help you minimize the delays in claims getting paid when it comes to insurance
- Remember these are not always things you’re going to learn from the Open Dental manual. Instead, it comes from using the system day in and out, making mistakes and learning from them – so I’m distilling the best practices I’ve learned over the last twelve years into the next ten minutes
- Timewasters: things that are nice to have, but don’t really need.
- Every piece of software has some things that are nice to have, but in practical daily routines, you realize there’s no real utility to it.
- I want to bring these up because when we speak with our client offices, I find lots of offices are doing this but when I ask about how they’re utilizing the information – they don’t have an answer and rethink their decision on why they were doing in the first place.
Best practices for efficiency and everyday workflow
Every piece of software comes with things that help you become more efficient – or gain speed in your everyday workflows.
Over the twelve years of using Open Dental, I’ve also changed how I use it and figured out how to do things fast to save everyone’s time.
Missing Teeth:
One of the first things I do when I’m doing an exam on a new patient and treatment planning – is mark missing teeth.
Of course, this probably isn’t something that’s new – it’s the basics and what we learned in dental school.
But in Open Dental, this helps in two of the following ways:
- Once I mark the missing teeth – the perio chart will automatically mark these missing teeth to be skipped so I don’t have to manually select the teeth on the chart to skip.
- It helps with writing up your narrative report to submit to insurance companies – whether it’s for claims or for preauthorizations.
For instance, some plans will ask you all missing teeth in the upper and lower arch when you’re trying to submit a claim or Preauth for a single missing tooth implant.
If there’s a tooth or teeth that you’re replacing with fixed bridge or implants, I always ask the patient when the extraction happened if it wasn’t done in your office.
Patient may not know it or remember the date – it doesn’t have to be exact.
You could always call up the insurance company and ask if they have extraction history for the specific tooth.
We note these dates down in the notes box below the tooth chart – Teeth #s and approximate date(s) of extraction:
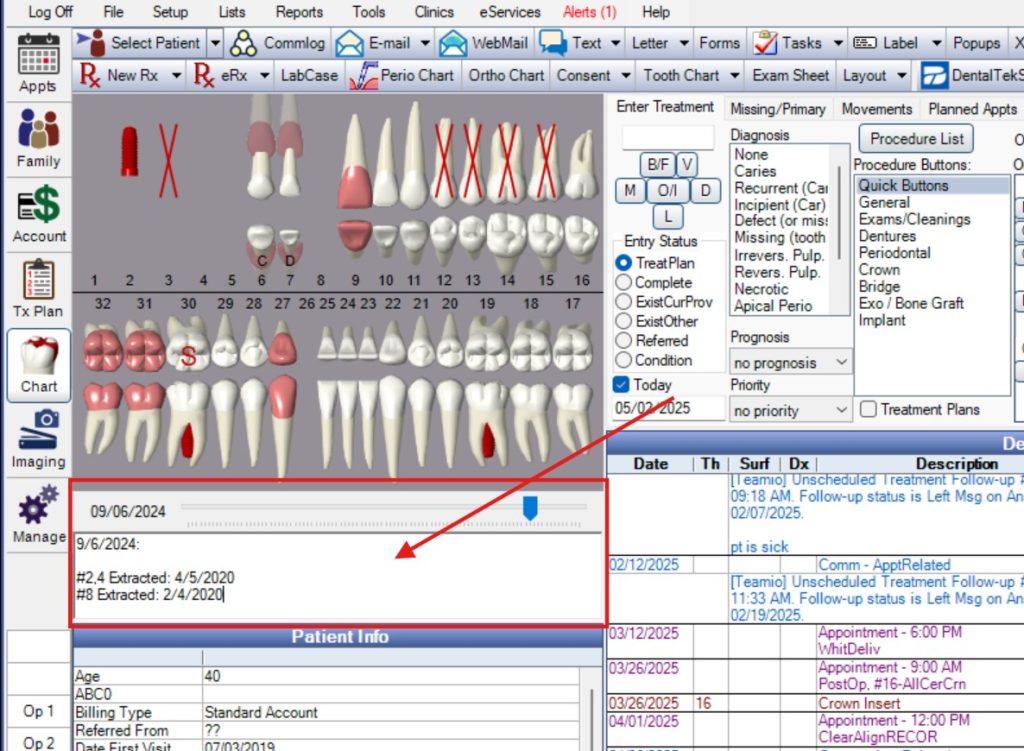
So marking missing teeth and their extraction dates are super important that will save you tons of time down the line.
And why is this even important?
Well, when you send in a claim for example for a patient who you’ve just paced an implant on – for some plans, if you just send in a PA xray post-placement – taht’s enough.
For some plans though, the claim gets kicked back and asks for missing teeth in all arches as well as the extraction date of the tooth that’s being replaced with an implant.
All of this back and forth delays your claims from getting paid – for some plans – 30 – 45 days from the day or service.
So you can avoid this from happening if you just get in the habit of marking all missing teeth and dates of extraction for teeth that you plan on replacing.
Initial or replacement of appliance (crown, bridge, nightguards, dentures, etc.)
Another thing that helps with your daily workflow when it comes to insurance – is that when you’re treatment planning and you notice the patient needs to have certain crowns or bridgework replaced, ask the patient for approximately timeframe when the crown or the bridge was done.
If the patient has a new insurance plan and no prior history, then these dates don’t really matter – I just stick to the default date of 12/20/2000.
If the patient has had the same insurance plan for a while and don’t remember when the initial crown or bridge work was done – it’s a good idea to call the insurance company to get the prior dates because you want to keep in mind the frequency limitation of the insurance clause when considering insurance reimbursement.
Because if the crown or the bridge was just done four years ago, and you’re recommending to the patient to have it replaced, the insurance is not going to reimburse anything.
This is because the insurance plan may have a five or seven year crown replacement rule.
And if you didn’t know this information, you’re going to be quoting the patient wrong out-of-pocket obligation because you’re assuming insurance reimbursement when you really don’t know whether the insurance will actually pay or not.
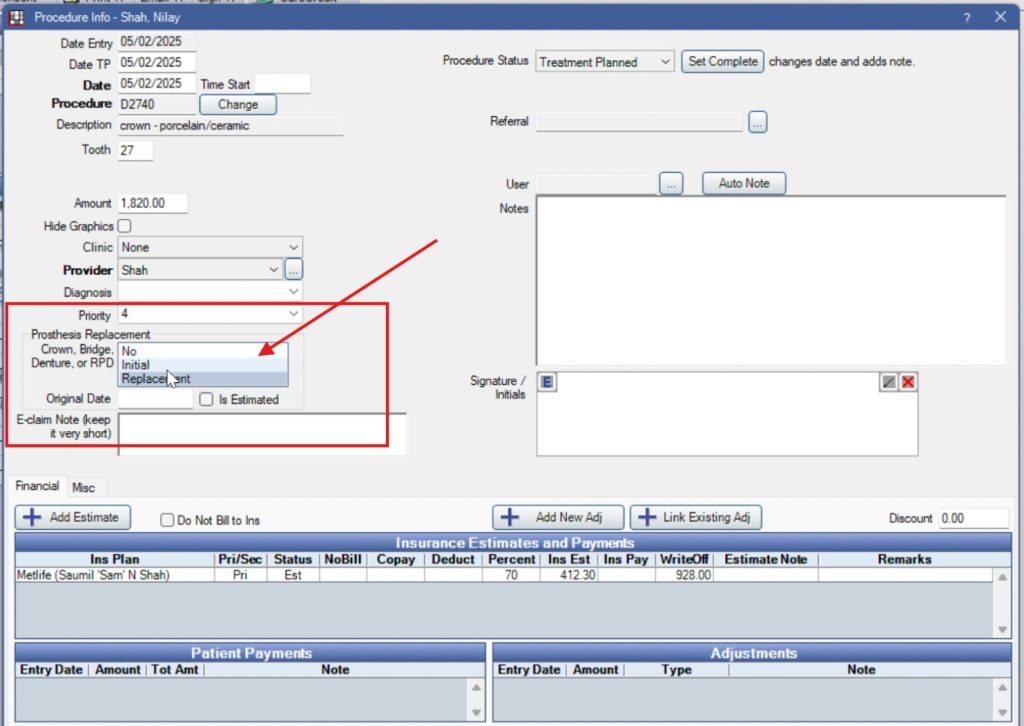
In Open Dental, whenever you treatment plan a crown or bridge, get in the habit of marking it initial or replacement.
If it’s a replacement, get the habit of putting in an approximate date of initial appliance.
And if you’re treatment planning a four unit bridge, for instance, you have to do this for each of the units – including the retainer(s) and the pontic(s).
This same thing applies to nightguards, partials and complete dentures since many plans have frequency limitation on these procedures.
Alright, let’s talk about the charting process and where you can gain speed.
Open Dental Charting: Entering treatment for patient’s treatment plan in their chart
In the Chart module of Open Dental, the procedure buttons allow you to quickly add procedures to a patient’s chart or their treatment plan.
When you first install and start to use Open Dental, it comes with some default ones.
But, you can set up custom ones for the most commonly procedures you do in your practice.
For example, I’ve set up categories for procedures that I do the most in my practice.
For instance, if I’m doing a surgical exo, bone graft on a tooth – I’d have to select the tooth, and then enter in two procedure codes separately – one for the extraction and one for the bone graft.
But by having these Procedure buttons set up, I’ve actually created 3 separate categories:
- One for when I don’t need to place a membrane so it’s just surgical exo/bone graft.
- Another one for Surgical exo/ graft and resorbable membrane.
- Another one for surgical exo/graft and non-resorbable membrane.
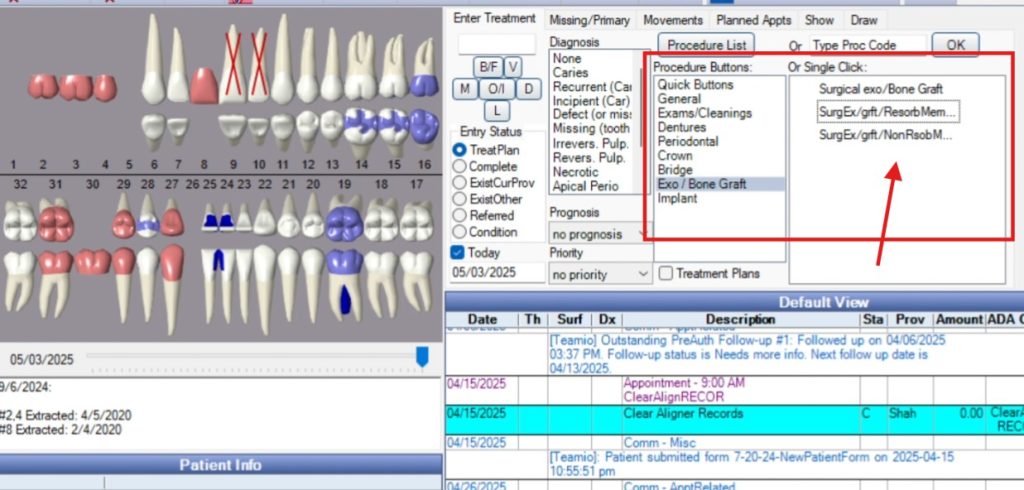
So now what I can do is – click a tooth, and just select one of the three quick buttons – and it will insert the corresponding codes.
So for exo/graft and resorbable membrane example – it will automaticaly insert the three codes for me.
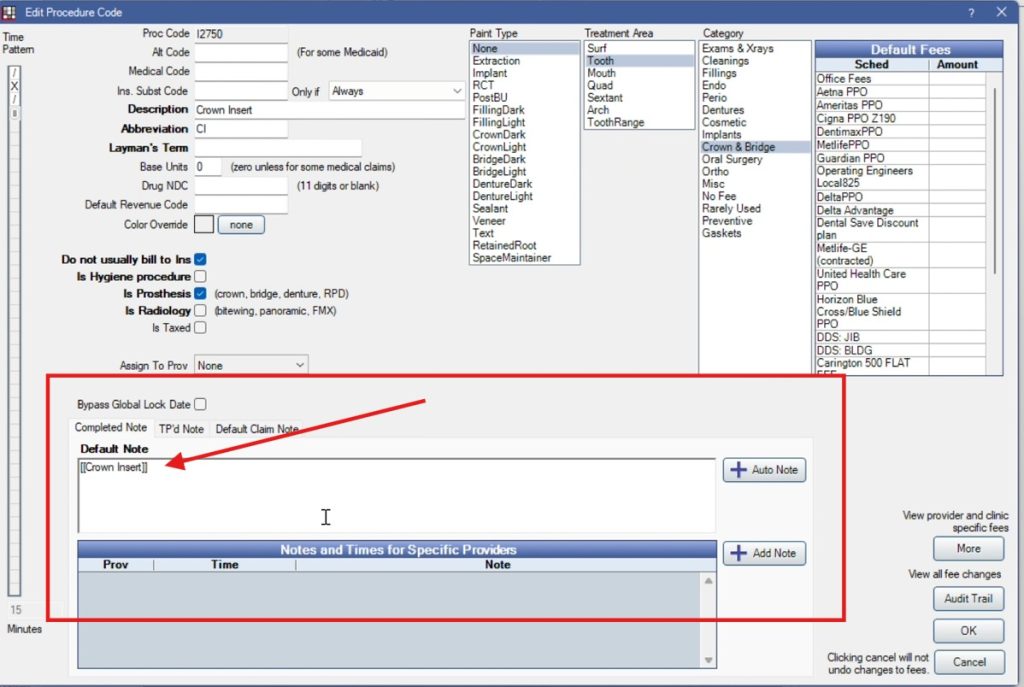
And you can set these up for things like Crowns – so if you click the crown code, it’s not only going to insert a crown code, for instance, D2740, but also a “crown insert” code – which is a non-fee code.
And when you’re bringing the patient back for appointment for the crown insert, you can assign the corresponding code that’s already in the treatment plan.
You can also do this for things like Partial Dentures.
Since it involves multiple visits, you can set up custom codes for the different stages for appointments: – custom tray, final impression, teeth try-in and final insert.
When you have patient sitting in your chair and you’ve treatment planned a partial – just by clicking on the Partial will insert all those different custom codes for each of the stages you’ve created.
This way when you make the patient appointments – you can assign the correct procedure code that matches with what you plan on doing.
The additional advantage of doing it this way is that if you have Auto Notes set up, when the patient checks out and the correct code that already should’ve been added to the appointment – and is marked completed by your front desk – it will automatically insert the Auto note for that procedure.
Then you can have your doctors go in and edit the note if they need, but it saves a ton of time when you’re doing this on patients throughout the day.
You’re probably thinking this is very basic, but as basic as it sounds, there are many offices who actually don’t attach procedures to the appointment when something’s being completed.
Why this is, it blows my mind.
But combination of quick procedure buttons and auto notes – it saves you a ton of time when you’re seeing patients back to back, and especially if you have multiple providers in the practice.
Open Dental Planned Appointments
One of the most underrated features of Open Dental is something called Planned Appointments.
What it allows you to do is create an order of appointments – these appointments don’t have to be scheduled.
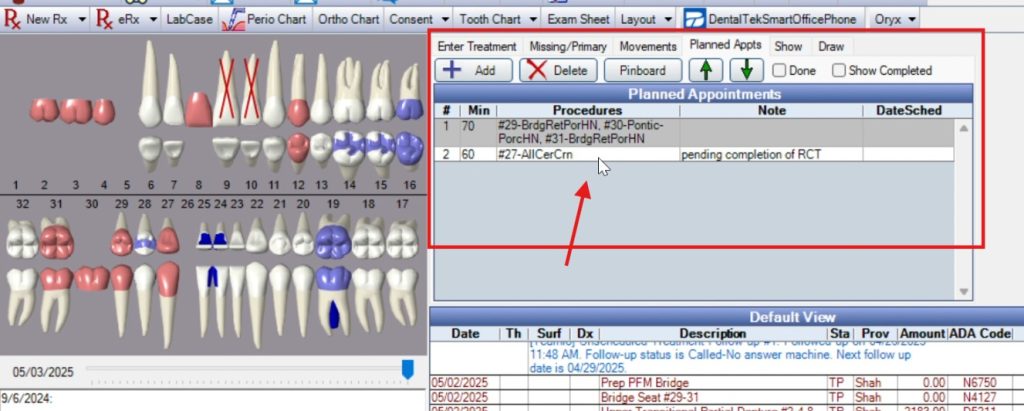
But the point is – after you’ve finished treatment planning with the patient – if the patient is to come back for work, by creating a planned appointemnt, you’re telling Open Dental what’s going to be done in that appointment (meaning, what procedures), and how long the appointment is going to be
You can create more than one planned appointment.
If, for instance, you’ve treatment planned a bunch of procedures for a patient, but patient leaves the practice with nothing scheduled.
If you have a planned appointment created with the correct procedures attached to it from the treatment plan that you plan on doing for the 1st visit – if and when the patient calls back to schedule..
your front desk team, or in fact, anyone in the office who has access to Open Dental, can see exactly what the patient is to come back for, what procedures are being planned for that appointment, and how long the doctor or the provider will need for that appointment.
So planned appointments is a great communication tool to streamline your workflow from having a patient treatment plan to getting appointments scheduled for your patients.
In my practice, since the beginning, we have a general rule that I follow is that if the patient needs any work done, there’s at least ONE planned appointment created for this patient.
If the patient doesn’t schedule an appointment after having presented the treatment plan, an immediate follow-up is created on Teamio to follow-up with that patient.
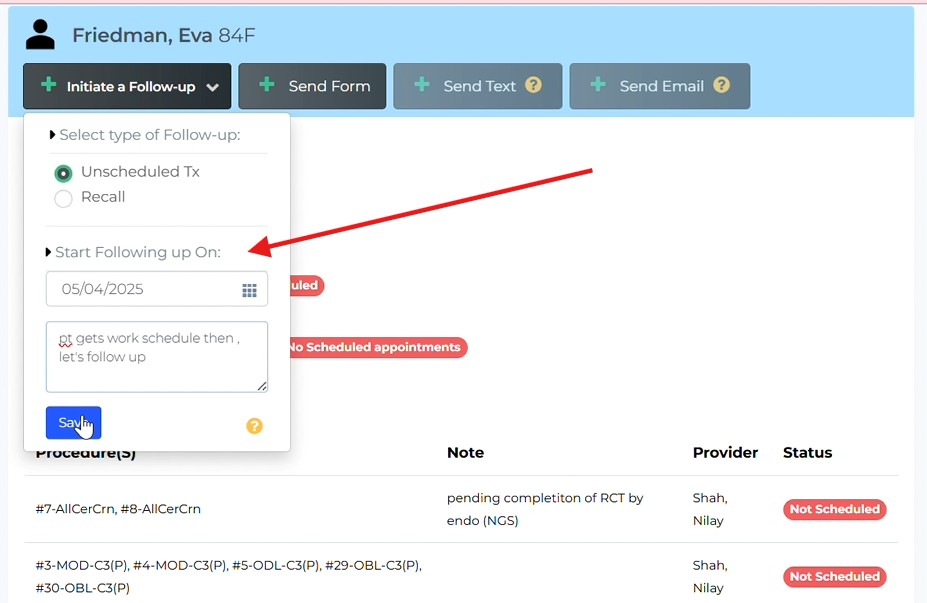
And what you’re doing is , creating accountability for your team.
And when they do go to follow-up, they can see immediately that there’s a planned appointment right away because we’ll pull that information from Open dental
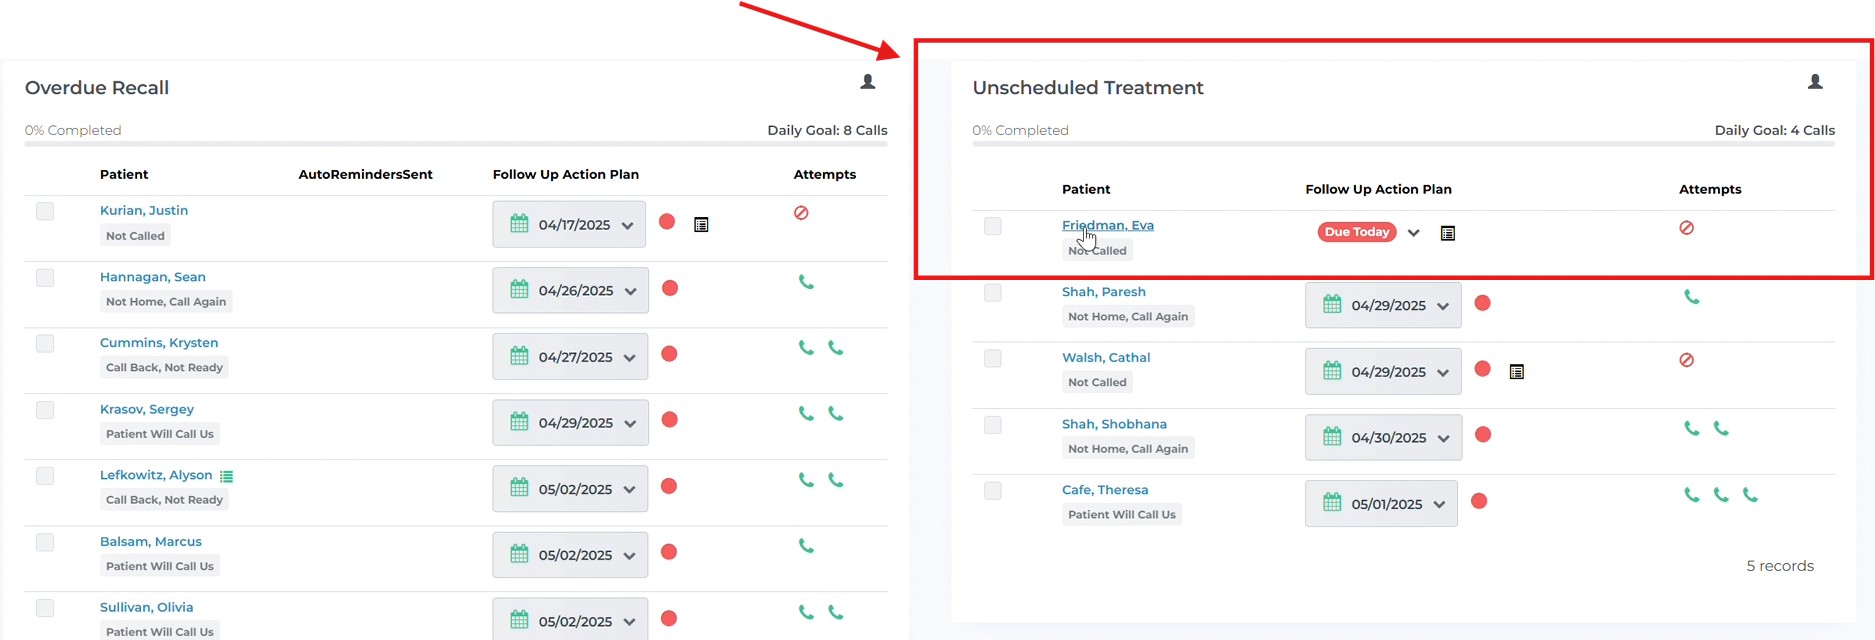
So having these kinds od systems in place helps not only for training, but also for keeping the schedule full.
Time wasters
Every piece of software will have things built in that you probably don’t use ever.
They’re there because some offices use them, or you may use it in the beginning when you’re starting out – but slowly realize there’s better way to do it, or there’s no need to do it.
So instead of going through this process and then realizing you don’t even need to do it – I made this so you can just fast forward and learn from my experience so you don’t waste time like i did.
For me, one of those things is marking existing conditions or restorations that the patient has.
When you a see a new patient in your office – and they have a restoration on every single tooth in their mouth – this could be a filling or a crown, a bridge, implant, etc..
WHY is it so important to mark down every single tooth and the restoration on which surfaces for each tooth..
I know we were trained this way in dental school – but I consider this one of the biggest time wasters.
One argument could be that you can track whether or not it was done in your office – well you can just look that up immediately on your software, or in the chart whether that tooth was ever worked on your practice.
You can even go back to the first set of xrays taken in your office prior to any work being done in your office – and boom it shows you the restorations right there.
And in fact, I bet not a lot people even care to look at the data overtime.
If I’m going to be working in a area – let’s say Upper right quadrant, and i’m replacing existing restoration due to recurrent caries, and replacing existing crowns – I would note that in my chart notes anyways that I’ve excavated recurrent caries under existing amalgam restoration on tooth so and so.
There are times you need to know when something was done prior to you moving forward with any work on the patient.
For instnace, you need to replace an existing crown due to recurrent caries, but their insurance plan says they won’t pay for it it was done less than 5 years ago..so now you need to know the date of their previous crown.
Same thing applies for extractions. Patient comes to you for implants but extractions were done somewhere else, you need to know dates of these extractions, and usually I ask the patient whether any bone grafting was completed.
I don’t care for the dates of their wisdom teeth extraction at this point because it doesn’t relate to anything I need to do or whatever I’m diagnosing on the patient.
I don’t care to mark on their char their existing MODL amalgam on #14 because there’s no work required on that tooth.
Speaking of time wasters, marking tooth movements into patient’s chart also seems too time consuming with little to no benefit.
Open Dental allows you to document teeth shifting, rotation, and tipping of the teeth..
They have this nice interface where you can select one or more teeth and then enter the shifting, or the rotational degrees by hitting the plus or minus button.
And it would display the teeth on their nice graphical chart.
But I’ve never found this to be helpful.
I can easily just write #30 mesially tilted If I needed to, but I don’t even do that – I look at their PANO and by looking at it in a second, I’ll know what’s going on.
But sure, I can understand that you may need to note that it’s mesially tilted at the time you saw them and it’s been like that to note their existing condition..
But even then I’ve never found the NEED to go BACK to it and look at this information that’s actually helpful to me when I’m working on the tooth or talking to the patient.
Remember, the goal of efficient treatment planning isn’t just to save time – it’s to create a seamless experience for your patients and reduce stress for your team.
I’d love to hear about your Open Dental experiences and any efficiency hacks I missed. Drop them in the comments below!