Understanding dental insurance terminology is super critical to make sure your dental practice gets paid for the work you do on your patients.
This video is for the practice owners, dental receptionists, or any other team members who may be dealing with dental insurance on a daily basis as part of their job.
If you’ve recently joined a dental practice, or are thinking of transitioning your career to work in a dental practice, learning dental insurance inside-out starts with understanding the everyday insurance terminology that’s used in a dental office.
If you’re a practice owner thinking about hiring a front desk who is not from the dental background, or maybe you’ve already hired someone new to dentistry – make this video a part of the dental receptionist training during their onboarding.
Instead of just listing out the different dental insurance terms, I’m going to give examples where possible to help you understand how it fits into the whole dental billing process.
Stick around to the end and I’ll go over some examples of EOBs to bring all the stuff you’re going to learn this video together.
What makes me qualified to make this video
At this point, you’re probably wondering what makes me qualified to even talk about this topic.
I started my dental practice from scratch back in 2013.
Coming out of residency and then joining other practices as an associate, I had no knowledge of any dental insurance stuff.
I had no idea how dental billing worked.
In the first four weeks of opening my office, I went through three different front office people.
I initially hired them for their experience because that’s what they said on their resume.
I had to rely on them because I thought that’s who calls the insurance, verifies benefits, generates claims, etc – and my job was going to be just focused on doing good work on patients.
Well, I learned some difficult lessons very early on.
I was so fed up with hiring people for the experience listed on their resume – every single one of the three people I worked with dropped the ball in some MAJOR ways:
One did not know how to calculate copays the patients would owe when they came in for work – even though we trained together with Open Dental
The second person I hired – I cannot forget this one, she started chatting with the patient after the appointment that she just FORGOT to collect patient out-of-pocket.
And this happened multiple times. Even though it’s been twelve years since it happened, you just can’t forget these things.
The last one I hired, just didn’t show up to work one day.
These were NOT the only reasons why the first two were fired, there were other reasons also – but I’m trying to keep the focus on the topic for the video.
I decided from that point on – I only wanted to work with people with no experience in dental for the front desk and I’d take my time with the hiring process.
I learned everything inside out about dental insurance, the dental billing process, verifying insurance, attaching it to their chart, generating claims, entering claim payments, etc.
I call it the Patient Revenue Cycle – the entire process from the point of first interaction with the patient over the phone, to getting paid for the service and having the money deposit into the business bank account.
Before I delegated ANYTHING, I learned all of it.
It’s not rocket science.
If you don’t know the information, you can easily look it up.
It’s a time consuming process, but you’ve got to put in the time to learn it once.
But ever since then, I’ve only hired two front desk team members in the last 12 years.
The first one had no dental background, but she had amazing work ethic.
She was open to learning, so I trained her on everything I knew about dental insurance and how to use the software to help her with her job.
She eventually had to move, so after about 6 years, I hired another team member also with no experience in dental.
Six years later today, she’s still with me today – and running the whole operation herself!
We work together pretty well since I’m very hands on.
In fact, she’s also been an inspiration to me creating some of these videos because I wish I had these videos around to show her.
So as I make this video, I’m doing it from this lens of “How do I show someone watching this video exactly what I was teaching her when I started?”
So I’ve done it twice and I believe I’ve done it successfully because all of my administrative work of the office is delegated to her.
If you haven’t seen the previous video which I did on terminology important for the business aspects of the practice – it will be helpful since I cover a few insurance terms that we use on a daily basis.
To help you, I’ve also included a printable Dental Terminology PDF along with images that you can reference while you’re working.
Let’s start with a term that gets thrown around a lot – Dental Billing.
What is Dental Billing?
The term dental billing is usually used for practices that accept dental insurance.
But it’s also relevant for a fee-for-service practice, which is not in-network with patient insurance, but may be filing paperwork for the patient to their insurance to help them get out-of-network benefits.
Think of the process of dental billing as this complete cycle with steps in between.
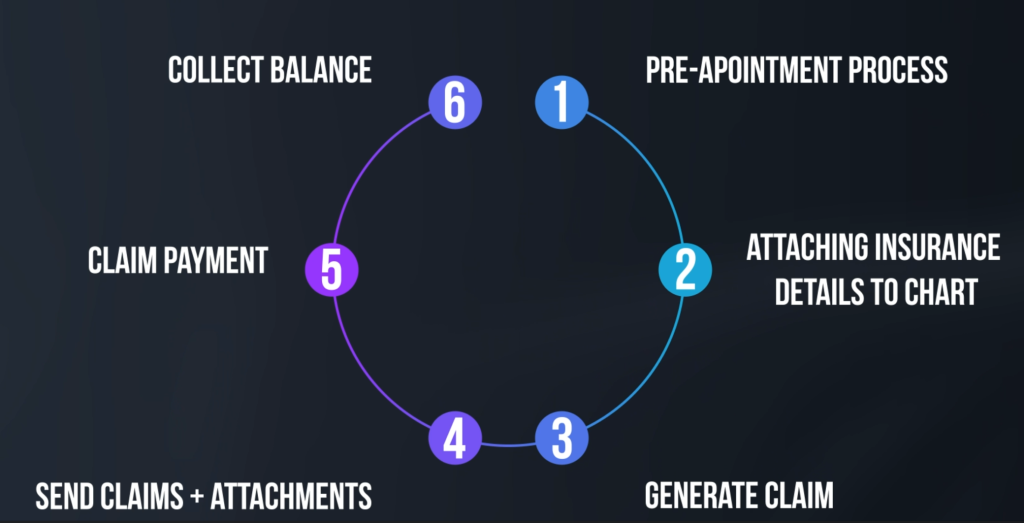
1. Pre-appointment process – Dental Insurance Verification
The first step would be a pre-appointment process for a new patient that wants to come in for an appointment.
And that process is dental insurance verification.
In order to present treatment cost to the patient when they come in, you need to know what their benefits are like.
The way to systematize and streamline the process of dental insurance verification is to follow a template for every single new patient.
I won’t get into the details here – but I have two specific videos on this topic.
In this post – How To Implement Dental Insurance Verification System In Your Office (Step-by-Step), I go over step by step how to verify insurances for patients.
You’ll be able to download a template, which you can follow and or customize to your office needs.
In the post Dental Insurance Verification – Open Dental best practices for spending less time on the phone, I cover best practices with Open Dental when it comes to insurance verification.
2. Attaching insurance details to patient’s chart
The second step in the dental billing cycle would be attaching the insurance details which you just received from the first step to the patient’s chart.
This info goes into the practice management software that you use in your practice.
This step is crucial because it’s going to help you determine patient copays once a treatment plan is entered into the system.
3. Generate Claim
Once the patient is in the office whether it’s for their exam or preventive visit or for any work, a claim for the service is generated – and that’s the third step.
Before the claim is sent, correct procedures should be attached to the claim.
4. Send claims + attachments
Once all claims have been generated for the day, the claims are batch sent to the insurance companies.
Depending on which 3rd party software you’re using for claim submissions, it notifies you of claims that need attachments to be sent.
These attachments are basically supporting documentation the insurance company requires for processing of the claim:
These attachments may in the form of intra-oral photographs, xrays, perio charting, narrative report, copies of EOBs, etc.
5. Entering Claim payments
Once claim payment is received in form of a check you receive in the mail or electronically, the claim has to be marked received in the practice management software.
6. Collect balance
As the patients are coming in for their work, their out-of-pocket should be collected the same day.
Some offices choose to not collect anything and wait for insurance to pay. Once the insurance checks comes in, then a statement is sent to the patient to collect the patient portion.
If the insurance pays less than what you expect, or end up not covering what you thought was going to get covered – there’s going to be a balance on the patient’s account regardless.
This balance must be collected from the patient either by sending them a statement in the mail, by calling them up and collecting the payment over the phone, or by pay via text.
So that’s the entire process or cycle of dental billing.
There are, of course, few smaller steps in the middle.
For instance, what if the insurance payment hasn’t come in and it’s been over 30 days and you’ve sent them everything needed to process the claim?
At this point, someone in the office should be following up on outstanding claims.
Outstanding meaning – claims that have been sent out but haven’t been paid yet.
Alright let’s move forward to some terminology.
Dental Insurance Terminology
Annual Maximum
Annual maximum is the total dollar amount an insurance plan will pay for a covered individual within a given benefit period.
So let’s say a patient has $1000 maximum under their plan.
The insurance will pay for the benefit period – up to $1000 for services such as cleaning, fillings, extractions, etc..
There are some plans that don’t count preventive services like exams, cleanings, and xrays towards the annual maximum.
This is nice for the patient because what would have been used toward those preventive services can now be used towards any work the patient may need.
After the benefit period ends (commonly a Calendar year) – it will once again renew and the patient will get another $1000 for the new benefit period.
Benefit Period / Benefit Year
Benefit period or sometimes referred to as the Benefit year is the 12 month period the insurance plan covers for an individual.
This can be calendar year or it can be something like from July 1st 2022 to June 30th, 2023.
When your team is verifying insurance, they need to find out what the benefit period for the plan is.
Effective Date
Effective date is the date the insurance company will begin paying for dental benefits.
But, just because the effective date is in place, don’t just assume the patient will have coverage right away because you need to find out if there’s a waiting period.
Waiting period
The waiting period is the amount of time the patient has to wait before insurance actually starts paying for benefits – and this is after the effective date.
Different plans are going to have different waiting periods – some plans have NO waiting period.
Even if there’s a waiting period, there’s usually no waiting period for preventive services – like cleanings and exams.
A plan may have separate waiting periods depending on the service.
What this means is that for things like fillings, they may be a six month waiting period.
For major services like crown, bridge, implants, etc. – they may be a 12 month waiting period.
If your patients get work done during the waiting period – your office will NOT get paid, so it’s super important that you verify if there are waiting periods during the dental insurance verification process.
Deductible
Deductible is the amount the patient must pay out of pocket before the insurance contributes anything towards a covered service for the benefit year.
Let’s go over how deductible is used in calculating how much reimbursement you can expect from the insurance and how much the patient is going to owe for this procedure.
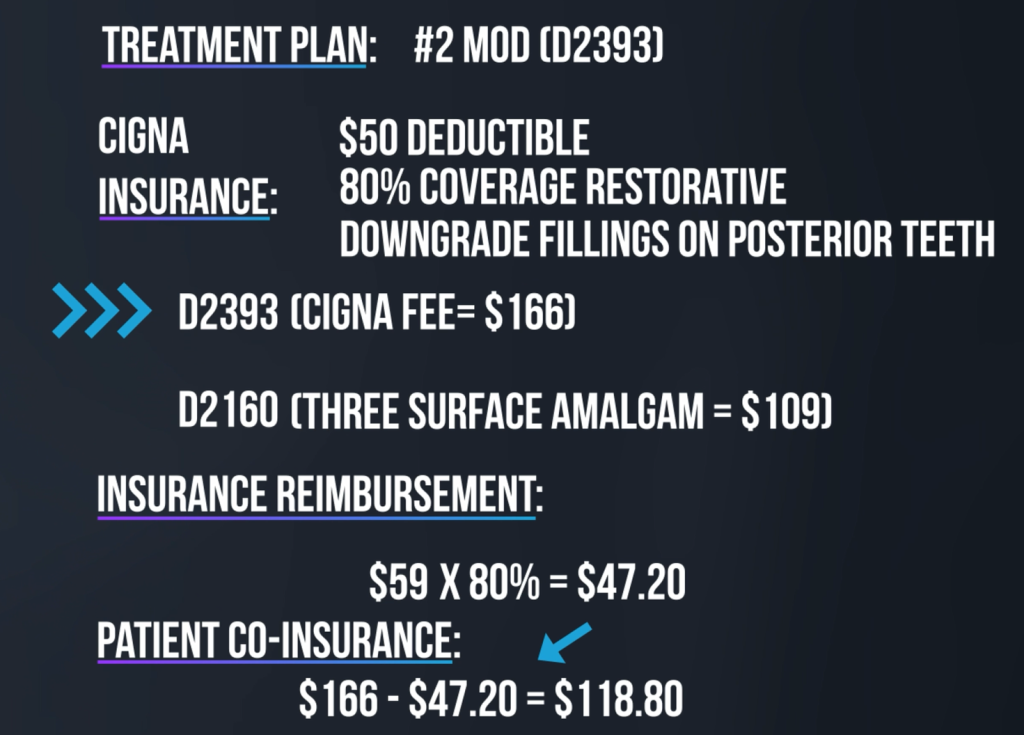
Here’s an example for just one procedure.
Let’s assume the Treatment Plan is for a three-surface composite filling on tooth #2.
D2393 is the code for the three surface filling.
Here are the details for the patient’s insurance that you verified during insurance verification process.
The deductible is $50, which the patient has not met yet.
There’s 80% coverage on restorative services, and there’s downgrade on posterior fillings – which means the insurance is going to downgrade composite fillings to amalgam fillings.
What this means is that when you send in the composite D2393 code, cigna will downgrade that code to D2160 and calculate the reimbursement based on the allowable fee of $109 and not $166.
How do you calculate insurance reimbursement from this information?
You take the allowable fee for the downgrade code which is $109.
You take away the deductible of $50 from it first, since it hasn’t been met yet = which is $59.
Since insurance is covering 80% of restorative, they will reimburse $47.20 (which is 80% of the $59).
What about the patient? What is the patient going to owe for this visit when they come in?
Co-insurance
This amount is referred to as Co-insurance
This is the % amount the patient has to pay along with what insurance is going to cover.
For this example, remember you’re going to do a composite which is D2393 – that’s the code that’s going to be on the claim.
So from the allowable fee of $166 for code D2393, the insurance is going to reimburse $47.20 as we just determined.
This leaves the patient out-of-pocket of $118.80.
It’s super important that you understand this concept.
You won’t be doing this manually for each procedure on the treatment plan since the practice management system you’re using will be able to calculate this for you.
And for that to happen, it’s important that you attach to their chart correct details that you get from their dental insurance verification.
Negotiated Amount (contracted fee):
This is the fee the dentist has agreed to with the insurance company as a payment in full for a covered service.
This is also referred to as the Allowable charge, or Maximum allowable charge.
For instance, your office fee for a crown may be $1500, but if you’re in-network (or in contract) with Aetna, Aetna contract fee is $800.
This means that the maximum you can charge the patient for this crown is $800.
Submitted Charge:
This term is usually used when you’re reading EOBs or Estimate of Benefit statements you receive from insurance companies.
Submitted charge is the fee that your office has submitted for a procedure when you’ve filed the claim for a service.
Usually, the submitted charge will be your office fee.
Here’s an EOB from Ameritas insurance showing submitted charge, which shows our office fee of $1878 for crown.
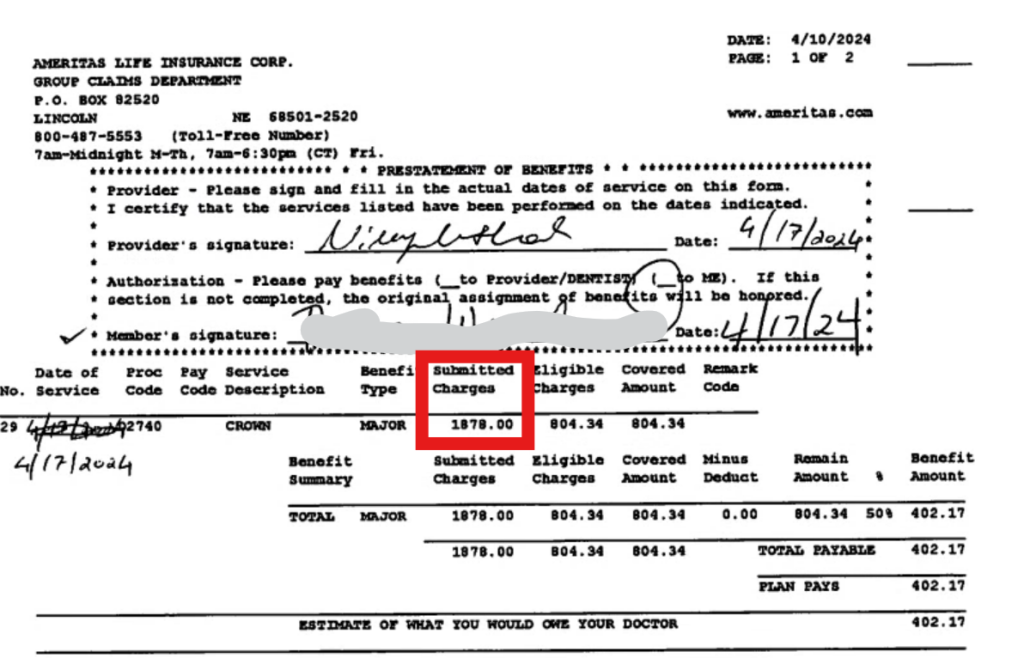
Right next to it, you see Eligible Charges – which really just means the contracted amount with Ameritas for the procedure.
Here’s another EOB from Aetna, showing submitted charges for Post/core and crown – which are again our office fees.
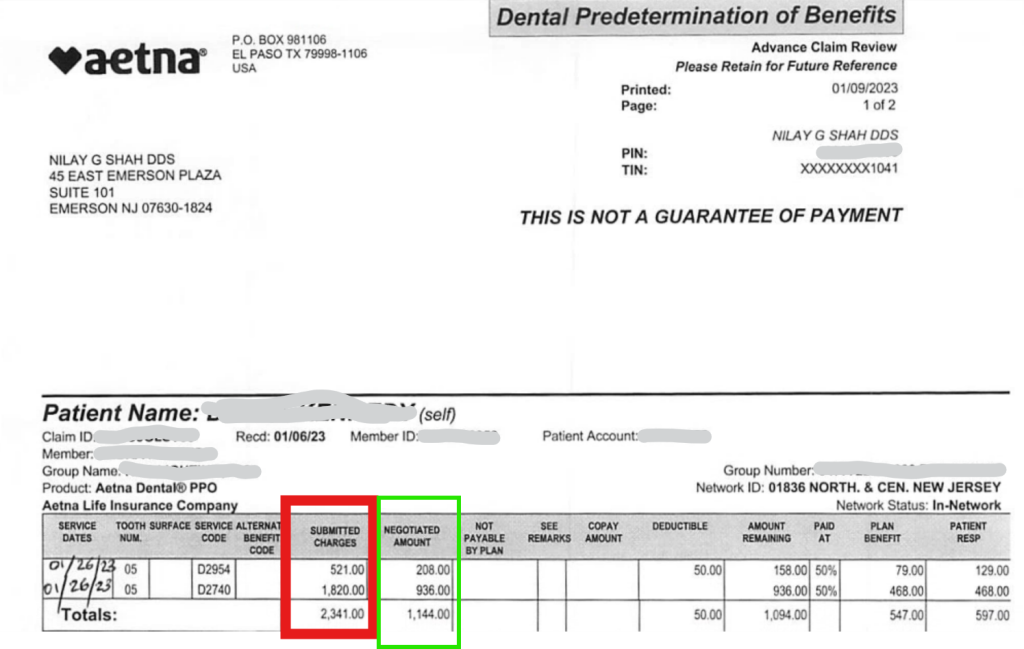
Right next to it, you’re seeing “negotiated amount” – which is again the contracted fee with Aetna.
Primary & Secondary Insurance
This is when a patient is covered by more than two insurances.
Patient may have their own insurance from their employer and they may also be covered as a dependent under their spouse’s dental insurance.
Which insurance is primary and which is secondary is determined by something called Coordination of Benefits.
Coordination of Benefits
When a patient is covered with two plans, the two insurance companies will coordinate the benefits for this patient.
And there are rules for coordinating the benefits for a patient with dual coverage.
The plan the patient gets from their employer is their primary and the plan they get from their spouse is their secondary plan.
For dependent children, the “birthday rule” is used when parents are married or living together.
So what this means is that the dental plan covering the parent whose birthday (month and day) comes first in the calendar year – will be the primary plan and the plan covering the parent whose birthday comes later will be the secondary plan.
There are other scenarios you need to keep in mind, for instance:
- what if patient has a COBRA or a retiree plan
- what about in case of divorced / separated parents
- what about medicaid plans
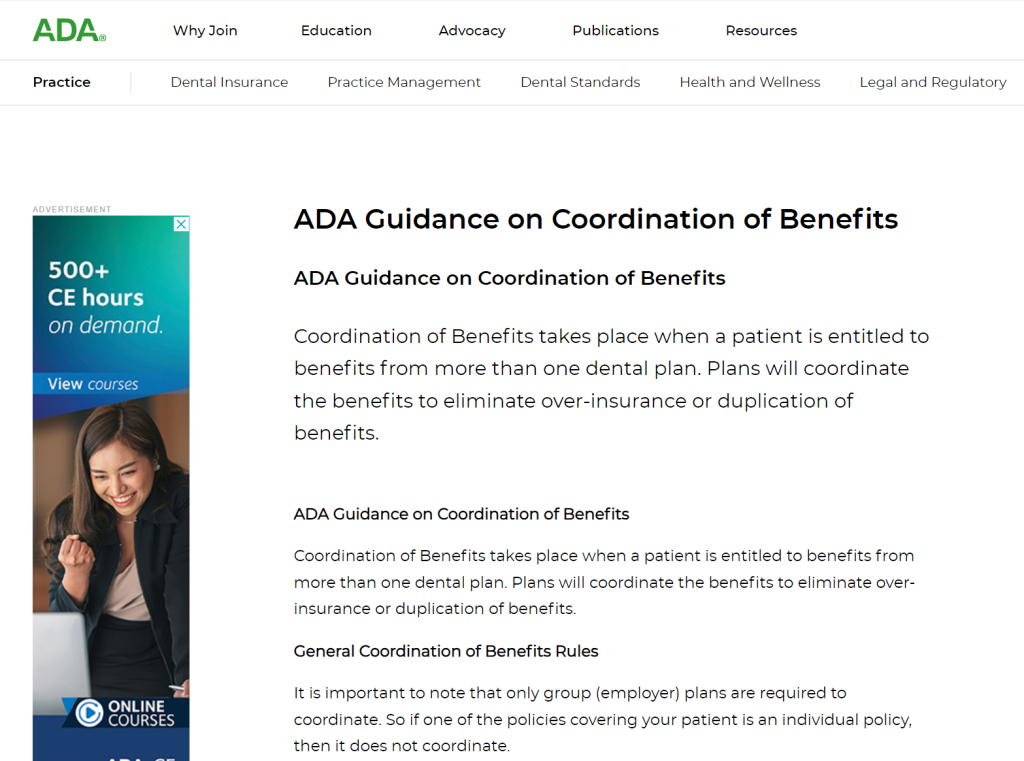
Instead of trying to memorize these scenarios, when needed, we like to refer to the ADA Guidelines on Coordination of Benefits.
Alternate Benefit code / Alternate Benefit:
I briefly touched on this earlier when I was showing you an example of insurance plan downgrading a composite filling to an amalgam filling.
The alternate benefit clause means that if the insurance plan thinks there are two or more professionally acceptable dental procedures that will work for the dental condition – the plan will pay for the least costly procedure.
And that’s what’s referred to as downgrade.
This happens in many plans.
For instance if you try to submit for an implant or a fixed bridge to replace a missing tooth for a patient – and the insurance company comes back and downgrades the service to an alternate benefit of a partial denture.
And now, the patient is left to pay the difference between that downgrade and the actual contracted fee for that implant or fixed bridge.
This kind of surprise can usually be avoided by sending in PreAuthorizations for major work – which is exactly what I do in my practice.
Assignment of Benefits
This is when a patient authorizes their dental insurance to forward payment on a claim for a procedure directly to their dentist.
This should be the default set up in your practice management system.
Pre-determination
It’s a statement from the insurance company stating what they’ll pay towards the procedures you sent in on the Predetermination claim.
The statement will indicate if there are any downgrades to an alternative treatment option, any deductible that may need to be paid, what the insurance payment is going to be, and what the patient out of pocket responsibility will be.
Predeterminations are NOT a guarantee of payment and insurance companies will clearly indicate that on the Predetermination claims.
What that really means is that the estimate on the predetermination claim is subjective to their plan and how much they have remaining on the plan once the treatment is completed.
I won’t get into the details here, but I’ve written three detailed articles on Predeterminations, which I’ll link to at the bottom of this video.
The articles cover:
- What you need to know to avoid insurance delays
- How to read a Dental Predetermination Benefit Statement
- Best practices
From the post on “what you need to know to avoid insurance delays”, you’ll be able to download a pdf that includes a chart for important x-rays and documentation you must submit to avoid delays from the insurance.
When you’re going through the best practices article, I’ve made available for download narrative templates for things like:
- post/core & crown
- partial dentures
- replacement fixed bridges
- replacement crown
- new fixed bridge
- extraction/implant & grafting
EOB (Estimate of Benefit)
The EOB is referred to as the Explanation of Benefit.
It’s a paper or electronic statement you get from your dental insurance company after you’ve submitted a claim for patient services.
The EOB is going to list any treatment performed, submitted charges, payments made by insurance, amounts that the patient will owe, any procedures not covered, deductible, etc.
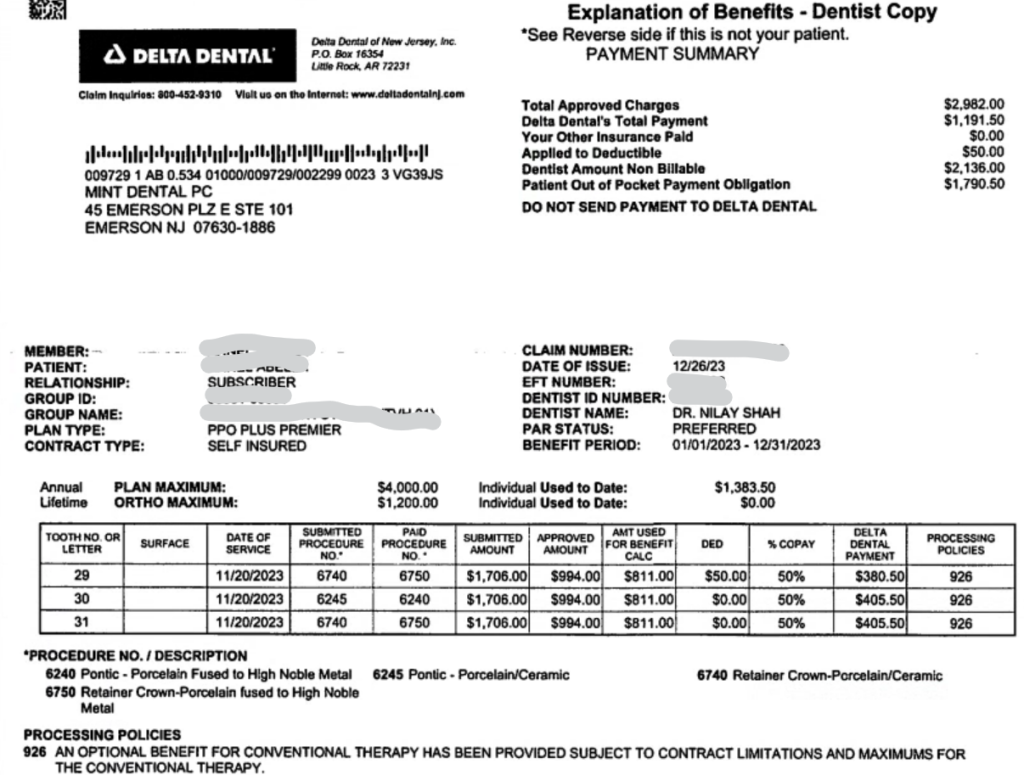
The EOB you’re looking at on the screen is for a fixed bridge from tooth #29-31.
You can see the submitted codes from each line item.
The submitted charge column shows my office fees.
The approved amount is the contracted Delta Dental fee for those codes.
The column that says “Amt used for Benefit calculation” is the fee for the alternate benefit code Delta dental has decided to downgrade to for each of the codes.
This is indicated by the last column titled “Processing Policies” – with a number.
And what that number means is written at the bottom of the EOB. Basically, it means they’re downgrading to an alternate code.
Let’s look at another example EOB:
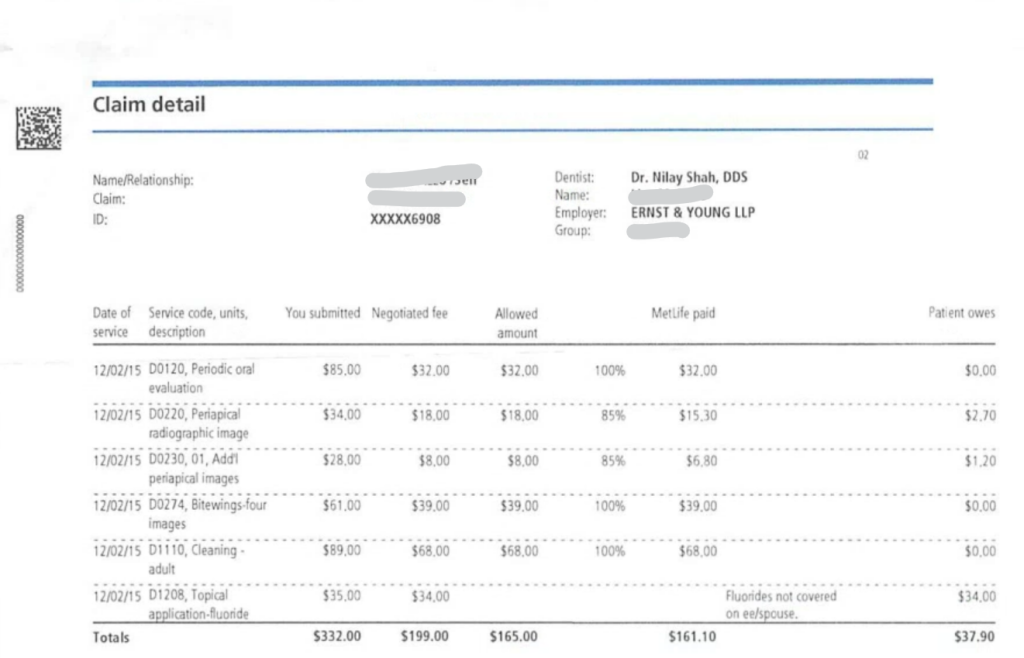
This one’s from MetLife.
This EOB is from the patient’s preventive visit when they came in for a periodic visit, prophy and xrays.
Once again, you’re seeing the submitted charge, the negotiated fee, the allowed amount, what the insurance paid and also what the patient owes for that visit.
Most EOBs show the same information – but will use different terms / terminology which may mean the same thing.
Alright, I hope this was helpful in getting you started in the world of dental insurance.
There are topics / terms from this list I can spend an entire video just talking about that specific topic – like EOBs and primary & secondary insurances.
Again, if you need a written list, you can download the pdf that’s going to have all this information for you to reference later.
If there’s confusion, or you have any questions, I always recommend that you write your questions by leaving a comment to this video because it also helps other viewers watching this video who may have the same question!
Thanks for tuning in! and until next time, take care!
1 comment
Thankyou for sharing this video. very helpful..