This is a continuation of a series of my posts on dental predeterminations.
The focus of this post is to show you how to interpret the dental predetermination Estimate of Benefits (EOB) statement when it comes back from the insurance.
This is to make sure you’ll actually get paid for the services you provide to your patients.
Most importantly, it’s going to help you present the out-of-pocket costs to your patients with accuracy.
We’ll discuss:
- Examples of Dental Predetermination Estimate of Benefits (EOB) statements for approvals, denials and downgrades
- Denial of work on a dental predetermination
- Dental predetermination approval example for implants
- Dental benefit downgrade example
- Best practices for generating claims involving treatment that’s been preapproved.
If you haven’t already, if you’re new to understanding how dental predeterminations work, I’d recommend reading the following two posts:
1st post in this series: Predetermination of Benefits For Dental Insurance – What You Need to Know to Avoid Insurance Delays
2nd post: Predetermination for Dental Insurance II: Best Practices To Implement
Examples of actual Dental Predetermination Estimate of Benefits (EOB) statements
After you send in the predetermination along with all the supported documentation, the insurance may approve the procedures you’re requesting for the patient or they may deny one or more of those procedures.
The insurance company could also “downgrade” the benefit. Meaning, if you send in a predetermination for a bridge, the patient’s insurance may actually downgrade the benefit to cover only a partial denture.
Whether it’s an approval, denial or a downgrade, it’s critical to understand what these EOB statements actually look like and how it will impact what the patient’s monetary responsibility is going to be for the treatment plan.
Denial of work on a dental predetermination
Here’s an example EOB that outright denied the crown I sent in for predetermination.
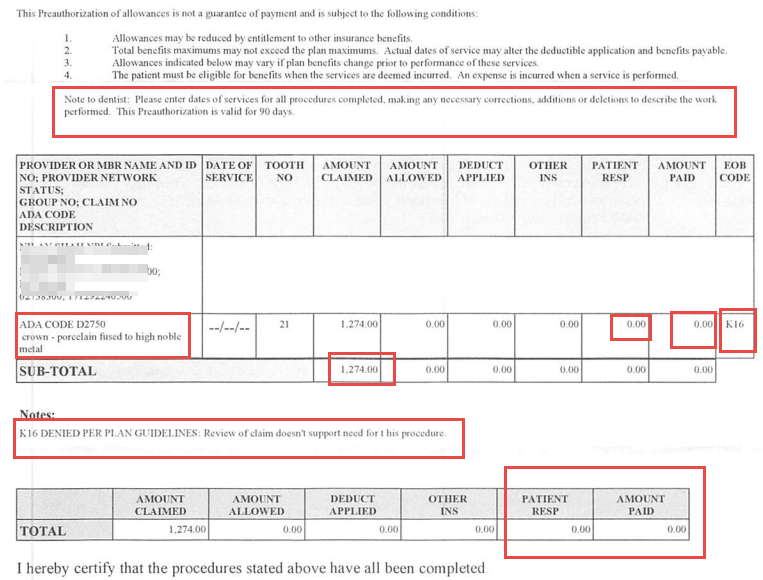
This specific EOB is from United Healthcare. They will look different for different insurance plans.
But if you understand the terminology and basics of what you’re looking at, then EOBs of other plans are easy to understand also.
Date of predetermination
At the top, next to “Note to dentist:” – the text indicates how long this predetermination is valid for. For this one, it was valid for 90 days. This means the procedure should be completed within 90 days of the date on this EOB.
It’s important to know because if a plan REQUIRES a predetermination to be sent for a procedure, and the date on the predetermination EOB is more than 90 days, then you risk getting the procedure denied when you submit the actual CLAIM along with the predetermination.
I’ve seen most plans’ predetermination valid for one year, but United Healthcare is 90 days.
In the table, you should see one or more procedures you’ve sent in for the predetermination.
You’ll see columns with information for that procedure:
- Amount claimed – this is my in office fee (or UCR fee) that I’ve submitted. This is sometimes referred to as “submitted charges” on other plans.
- Amount allowed – this is the insurance fee. It’s zero on this EOB because the procedure is denied. Again, this may show up differently for another plan. This sometimes is referred to as “negotiated amount” on other plans’ EOB statements.
- Patient responsibility: this is the patient portion of payment required for the procedure.
- Amount paid: This is the estimated insurance payment you can expect should this procedure be covered. United Healthcare call is “paid” even though this is not an actual claim, but a Predetermination document.
- EOB Code: These are short codes for explaining why a procedure is getting denied, or downgraded. You may find one of more codes on a line item or procedure. Towards the bottom – you see the explanation of K16 – according to this EOB, United Health care doesn’t seem this crown is necessary for this patient.
I’ll get to what happens once you have a denial of a procedure on a predetermination in a few. But let’s continue with the examples.
Dental predetermination approval example for implants
Here’s an example of a predetermination which was sent out for implant placement, custom abutment and implant crown.
This EOB is by Aetna.
Similar to the example I discussed with United Healthcare – you see the similar columns: submitted charges, negotiated amount, amount remaining, what the procedure coverage % is, etc.
The last two columns, and the most important: The plan benefit and patient responsibility. I look at these pretty much and skip the other details because I know right away at least there’s coverage on the implants.
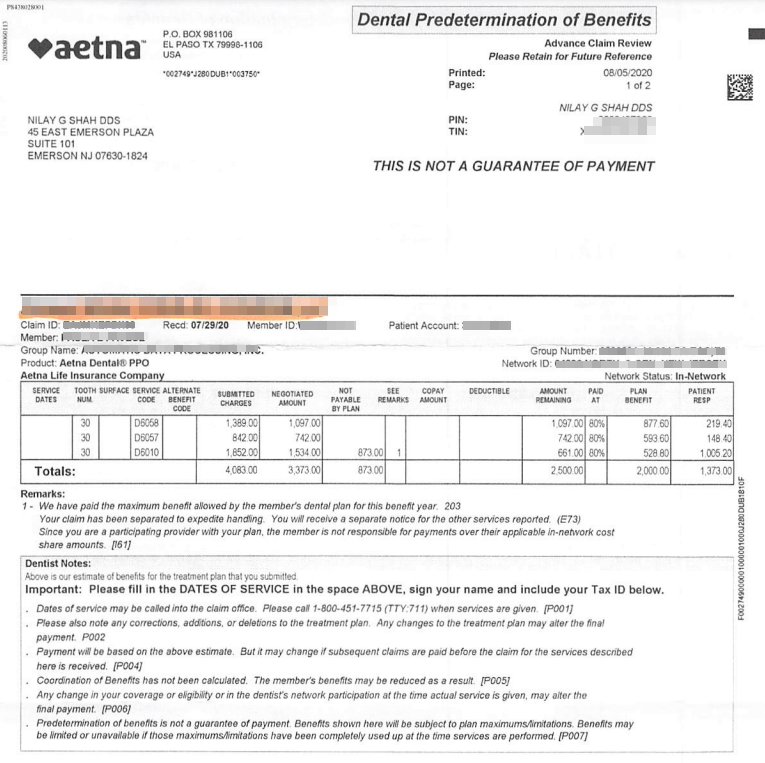
As long as the patient’s plan as $2000 remaining, I will be paid the $2000 as stated on this EOB under “plan benefit”
The sum of the total plan benefit and the total patient responsibility should be the total sum of Aetna in-network fee for all the procedures listed on this EOB.
It’s always important to understand the text in “small print” at the bottom of the benefits.
All EOBs you get for dental predeterminations will state something along the lines of “predetermination of benefits is not a guarantee of payment. Benefits shown here will be subject to plan maximums/limitations. Benefits may be limited or…”
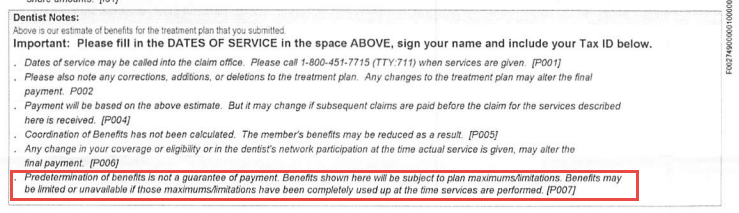
This just means that even though this EOB states they’ll pay $2000 towards the implant services, if the patient’s plan doesn’t have $2000 remaining out of their maximum, the payment will be lowered to whatever’s left on the plan.
Let’s say you’ve received this EOB in the middle of the year, but patient has just come back from the Endodontist after a re-treat on #31, you know the patient may have used up some insurance benefits.
So you need to check how much is remaining on the plan AFTER the claim for tooth #31 is processed!
Let’s say the patient only has $1000 remaining on the plan.
When you finish the implant work on this patient and you submit the claim along with the predetermination, then you’ll receive a maximum payment of $1000 since that’s what’s left on the plan.
That’s really what that small print means – that payment after service is completed is subject to plan maximum limitations and frequency limitations!
Dental benefit downgrade example
Dental insurance companies can also downgrade a benefit, for instance, for a posterior molar composite to an amalgam, a posterior PFM crown to a cast metal crown, fixed bridge to a partial denture, etc.
In the example below, the implant crown on #19 D6058 ceramic crown has been downgraded to a cast high noble crown – D6062. According to this plan, MetLife does not cover any Porcelain, Veneer or Titanium materials on molars.
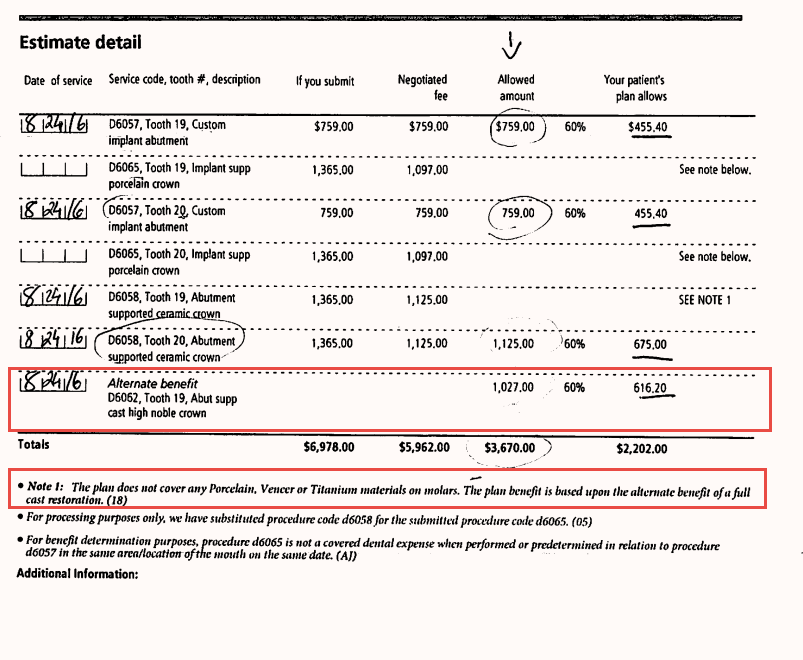
However, as an in-network dentist, I’m allowed to collect the difference between what the insurance pays for a cast high noble crown and the in-network fee for the ceramic crown.
So in this case, for #19, I would collect from the patient the difference between what’s allowed ($1125) and what the insurance expects to pay after the downgrade for the tooth (616.20).
This was a relatively small substitution or downgrade for a benefit.
Compare that to when the insurance decides to downgrade a bridge to a benefit of a partial denture!
It’s ridiculous, but it happens.
Just because the insurance denies benefit for a procedure and substitutes it for something that’s MUCH cheaper – doesn’t mean that’s what you should do for a patient.
They don’t pay because they want to reduce payouts.
HOW you explain this to the patient is super important because the patient will assume just because the insurance is covering the partial – it means that’s the right clinical procedure to be done for them.
Be honest and upfront with patients and let them know exactly what’s happening: this is what I say – “they just don’t want to pay for it because they have to payout a lot more for a bridge than for a denture”.
What you decide to do next depends on your financial presentation to the patient.
Here’s a post on Financial Arrangement and Treatment Planning that you should reference for understanding how to use treatment plan templates to quickly create financial arrangements for patients.
Best practices for completing work approved via a dental predetermination
Once you’ve completed work that has been preapproved on a predetermination, there are simple steps you need to take to make sure you still get paid.
These steps are different depending on the plans you take, but it’s not complicated.
Some plans require you to submit the predetermination EOB when you generate the claim for the services you completed.
There are some plans that require the patient’s signature on the predetermination EOB, so make sure at check-out while you’re collecting payment from the patient, your team gets the patient’s signature on the predetermination document also.
Regardless of whether or not there is a requirement of submitting the predetermination EOB with the claim, there’s some routines that I always follow, which I think you’ll find useful in your daily workflows in your practice.
Once you’ve completed the work, always fill out the predetermination EOB by filling out the following:
Date of completion / Date of service: this is the date you completed the procedure.
Doctor signature: put your signature and date on the document.
Patient signature: Only for certain plans, make sure to have this prior to sending out the claim.
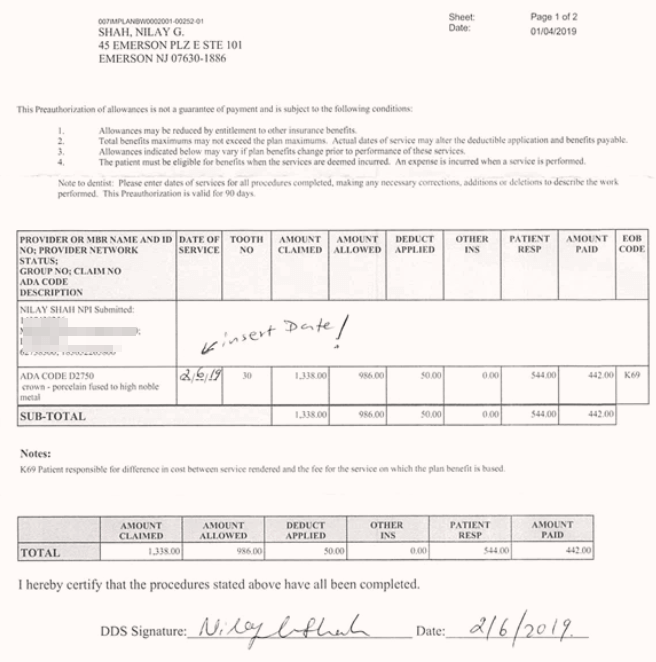
Keep a copy of this document in the patient’s chart.
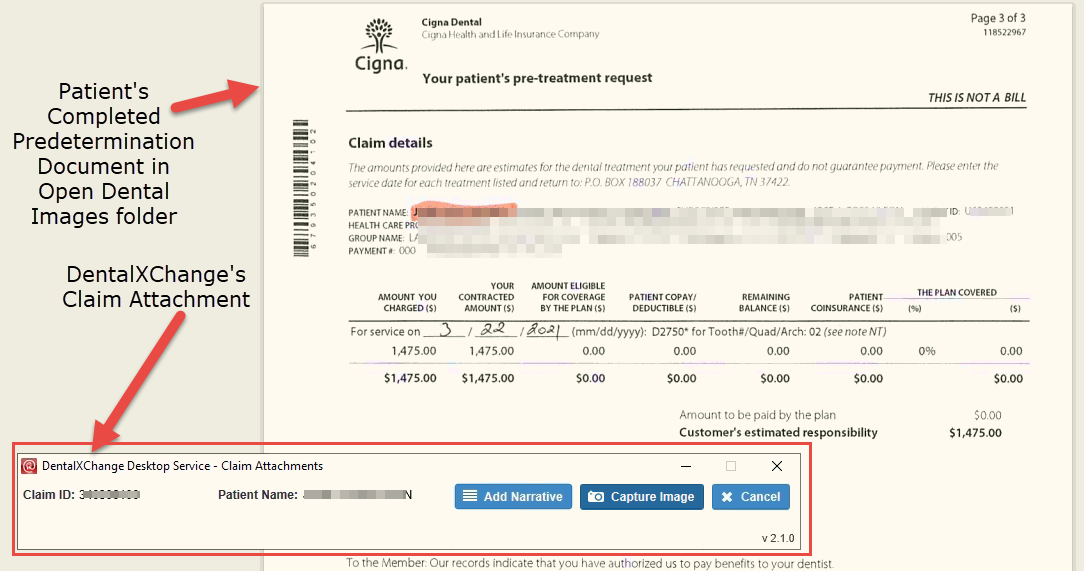
My team scans the completed predetermination into the Open Dental Images module for the patient.

When you generate the claim at the end of day for the procedures completed, you can easily attach the copy of the completed predetermination EOB using the electronic attachment software.
In my practice, I use DentalXChange for Claim submission, and they have an application for attaching required documents to claims electronically.
Here’s a snapshot of the screen where the DentalXChange attachment application is running in the background – allowing me to capture the screenshot of the patient’s completed Predetermination document directly from within Open Dental.
Along with the completed predetermination EOB, we re-submit all the xrays and other supporting documentation (Perio chart, pano, etc) even though we have a pre-approved EOB on file.
This way you’re giving them all the information because we don’t want ANY delays in payments. We’ve had a scenario where even though we submitted the completed approved predetermiation document along with the claim, the insurance came back and said we needed to submit xrays.
It’s completely ridiculous – where you’re doing the work twice! I submitted xrays to try to get the work approved initially, and now that’s it’s approved, they want xrays again for the processing of the claim!!
But you learn! You can’t change their process, so just build this system into your workflows to prevent headaches and move on!
Primary and Secondary Insurances:
Imagine the workflow I’ve discussed so far, and now think about doing it TWICE – once for EACH insurance the patient has!
Normally my process for PreAuth for dual insurances is this:
Let’s say a patient needs two crowns. Normally I don’t send out predeterminations for crowns, but if there’s a slight doubt in my mind about whether or not the insurance will pay for it – I want to create a narrative report along with intra-oral photos and send it along with a predetermination to get it preapproved before I do any work on the patient.
So let’s say a patient needs two crowns and they have two insurance – Primary is Delta and secondary is MetLife.
So my process is this:
Send the predetermination for the two crowns to Delta first. Wait for the result, and then take the predetermination EOB from the Delta and send it to the secondary (MetLife).
Wait again for the approval from MetLife. Once I receive the approval from the secondary, I’ll review both EOBs with my front desk.
Total of expected payments from both plans should equal the primary’s allowed amount for the procedure.
I’ll get into details on how to deal with dual insurances in another post.
Closing remarks
Understanding how PreAuthorizations fit into your practice workflow is critical in not only increasing patient case acceptance, but it also helps patients understand what they’ll owe prior to moving forward with treatment.
Setting correct expectations – whether clinical or financial – up front prior to starting ANY work is paramount to keeping a happy patients base for your practice.
As I’ve always said, it is best to set up routines and systems for everything in your practice.
In the case of this post, I’ve established a nice routine for sending out preauthorizations for my patients and what happens when they’re returned to our office with either denials, downgrades, or approvals.
You don’t have to have this same exact process, but, I hope this post helps you in understanding WHY you need a system and where you can start!
Keep tuning in!