Financial arrangement and treatment planning for patients in a dental practice is a critical component of overall practice management.
Treatment planning we learned in dental school is a great foundation from a clinical standpoint, but once you’re out in the “real world” – either as an associate or in your own practice – proper financial arrangements need to be in place for patients to accept your recommended treatment.
This is a continuation of the previous post on Patient Financial Policies & Payment Options. If you haven’t read it, make sure to read it as it goes over the basics of the “Financial systems” of the office. For today’s post, I’d like to tell you about how I approach patients who may have larger treatment needs, which may involve breaking up their treatment into phases.
I’ve also included downloadable templates that I use on a daily basis in my practice that you’ll find very useful to reference and edit as needed for any patients.
What this post is not: This post is not a philosophy oh how WHICH treatment should be rendered. You and I both know that if we ask another dentist for their opinion on how a tooth can be saved, it could be totally different from what we had in mind.
This is simply my take on how I’ve approached treatment planning and financial presentation to the patient when their treatment involves multiple visits, and maybe, multiple specialists.
Here’s what you’ll get out of this post:
- Financial arrangement & treatment planning for Fee for service patient
- Financial arrangement & treatment planning for a patient with insurance whose benefits have maxed out for the year
- Financial arrangement & treatment planning for a patient with self-bought insurance with fixed copays
- How to use the templates and stay organized with free services available online for storage and quick access
Let’s dive right in.
Just because you’re starting out, don’t think you won’t get a patient right away in the door who needs a bridge, implants, multiple endos, etc.
It’s true that for majority of the patients, you need to have built trust with them prior to you providing any treatment for them. This is especially true when the treatment cost is thousands.
For some patients, it’s as simple as them seeing your advertising flier and coming to you see after the very first time they receive it in the mail.
During their visit, you discover that they need multiple root canals, extractions, grafting, implants, etc. After you’ve told them, they’ve even decided to move forward with treatment right away by scheduling their next appointment.
You’ve just opened your doors to your brand new office last week, and here is a patient who you haven’t built any trust with wanting to move forward with ALL of the treatment ASAP. You have no dedicated team member to present the finances AFTER you’ve gone over the clinical importance of the care with the patient.
You still need for yourself and for the patient to know how you’re going to sequence the treatment, present the cost of the treatment, discuss financial arrangement for the treatment – ALL without a treatment coordinator / financial coordinator or anyone else who may be hired to present treatment and discuss finances with patients.
If you’ve overwhelmed, it’s completely normal. Five years into my practice, and I still don’t have anyone that presents cases or finances to patients. All treatment and finances are presented by me right in the operatory, so having pre-formed templates definitely helps.
Do I present treatment and discuss financial arrangement for the ENTIRE treatment plan the same day? Answer is – No, not always. I summarize what I’ve discussed and break it up into phases. The only cost I let the patient know is what they’ll be responsible for at their NEXT visit, which, if couple days or weeks away, gives me time to put together a customized treatment plan, cost and financial arrangement.
Stress the fact that you’re creating the custom document for THEM – patients always appreciate this – because they know they’ve probably never had a doctor present it this way. They’re used to having an “itemized” printout of all the fancy dental codes on a sheet of paper with big $$ right next to them.
When the patient presents for their next appointment to get the work started, I present the document and go over it, so they understand the overall plan, cost, and when the payments are to be made.
Let’s look at some examples to show how I’ve set this up and how I present my treatment plans and cost. For simplicity, I’m going to start with a fee for service patient, so we’re not dealing with limitations of insurance.
Example 1 – Financial arrangement & treatment planning for a fee for service patient
Here’s a patient of mine that presented to the office who had been referred by another patient who had gotten multiple implants done with me. Her chief concern at the first visit was that she wanted to get upper teeth and she didn’t want a big gap in the back to show when she smiled.
Upon clinical exam, she needed multiple extractions, multiple implants on upper and lower arch. After the comprehensive exam, all recommended treatment and notes are entered into the patient’s chart on opendental. But whenever I’m dealing with larger cases involving multiple appointments that may span months, I never use the printout from the practice management software.
Because her chief concern was only the two upper teeth, I split the treatment plan into phases. First phase would involve giving her those teeth she requested to have done first.
Here’s the template I used:
Let’s dive into the details.
No matter how large of a treatment plan, there are a few things that you should keep in mind:
- ALWAYS keep it simple: I aim to keep any printouts of treatment plans I give to a patient ONE page only. If it’s more than one page, it’s more information than what they need to know at THIS POINT. So break it up in phases and have them simply sign off at start of each phase. You can include a second page for Payment Schedule / Financial arrangement only – but a treatment plan should be one page.
- Include area of the mouth: when writing out recommended treatment on the plan, don’t just list teeth numbers. Patient doesn’t know teeth numbers, they may remember what you told them during the exam if you write out where the tooth is located in their mouth .
- Show appointment schedule WITH sequence and write out what to expect to have completed: Dates don’t matter here. Time frame is more important to them than anything. They just need to know when they can expect to have their teeth by. Tell them what’s going to be done and when like you see below.
- Show time in between appointments: When doing implants, for example, they need to know that teeth go in after 3-4 months after having the implants placed, unless of course, you’re doing an immediate implant followed by placement of a provisional (temporary) crown.
Most patients assume they get teeth the day they come in for implants. Make sure to tell them during their treatment planning visit. You’ll be surprised how many patients actually are shocked to hear that. - Your customized treatment plan is a reinforcement of what should’ve been already discussed during your presentation before you present finances.
- Sit with the patient and go through the printed customized treatment plan. Don’t just present treatment and have them take your print out at home and expect them to understand. Get them to engage and ask questions to make sure they’re no confusion.
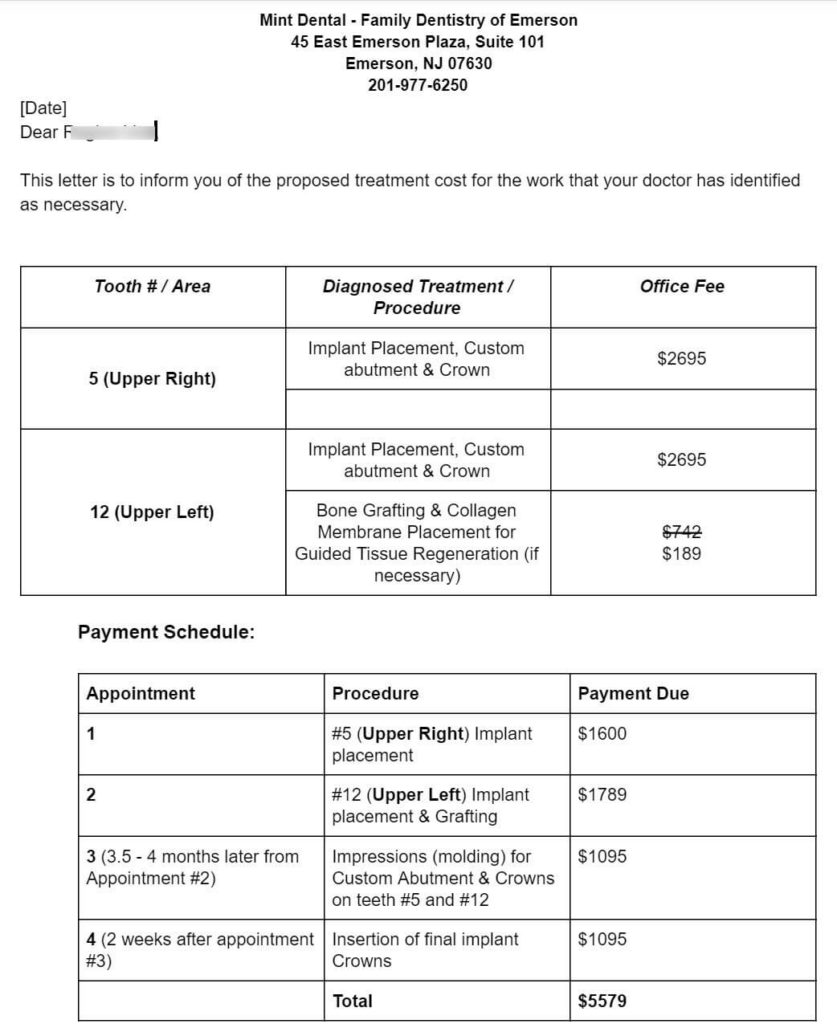
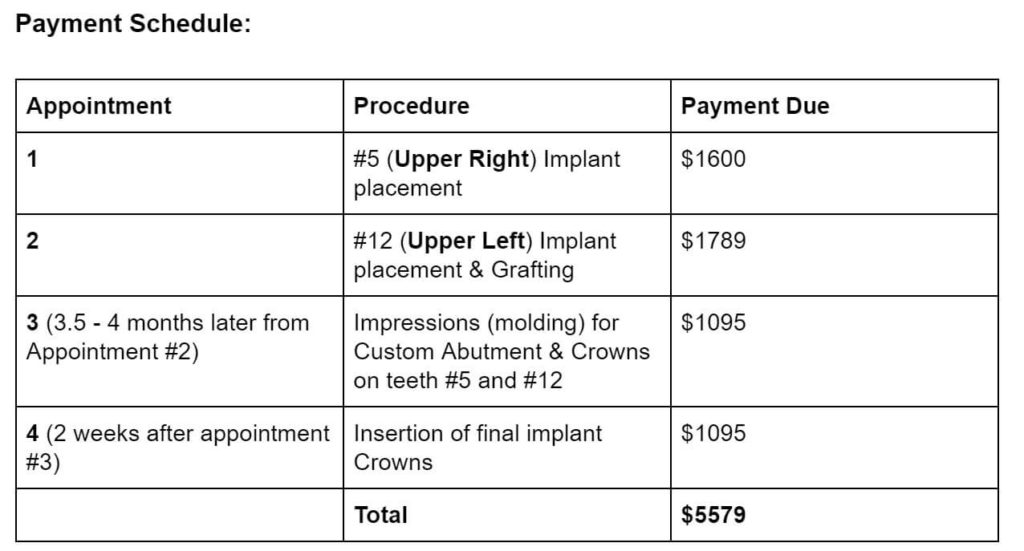
Example 2 – Financial arrangement & treatment planning for a patient with dental insurance
For the patient in the example below, the patient’s insurance is maxed out for the year and has about five months left before his plan renews next January 1st.
Patient presented with a loose tooth #10 crown. Patient was presented with a treatment plan for having the tooth extracted due to the fractured post/core and root structure. Immediate implant placement with a placement of a temporary removable appliance (flipper) was recommended, followed by placement of custom abutment & implant crown four months later.
Make sure to follow your State’s rules when it comes to figuring out what you can charge the patient when their insurance maxes out. In New Jersey according to this patient’s insurance contract, as an in-network dentist, I’m still obligated to follow the insurance contracted fee for any procedures completed.
For this reason, I’ve listed on the template the Insurance Fee for each procedure planned and my office fee (which is crossed out), so the patient knows how much they’re saving with their insurance.

You may notice that the fees for the implant codes (placement + custom abutment + crown) add up to $3301, whereas my implant fee for everything start-to-finish is $2695. According to my contract, I’m obligated to charge the lesser of the two – so in this case, the start-to-finish fee for the patient’s implant, abutment and final crown is $2695.
I’ve included a possible reimbursement from his plan towards the implant crown because it was confirmed at the time of his insurance verification that the patient does have benefit towards the implant crown, but not for placement.
Since the crown is not to be seated until January when his plan renews, he should have some reimbursement should the plan approve the pre-determination that is sent out for the procedure.
Let’s consider another example for a patient with a self bought insurance plan (individual plan).
Example 3 – Financial arrangement & treatment planning for a patient with a self-purchased dental insurance
Here’s a template where I only showed the patient copays as dictated by their insurance coverage. Not all individual plans purchased by patients are the same. This one in particular happens to have fixed copays for procedures in addition to some reimbursement from the plan.
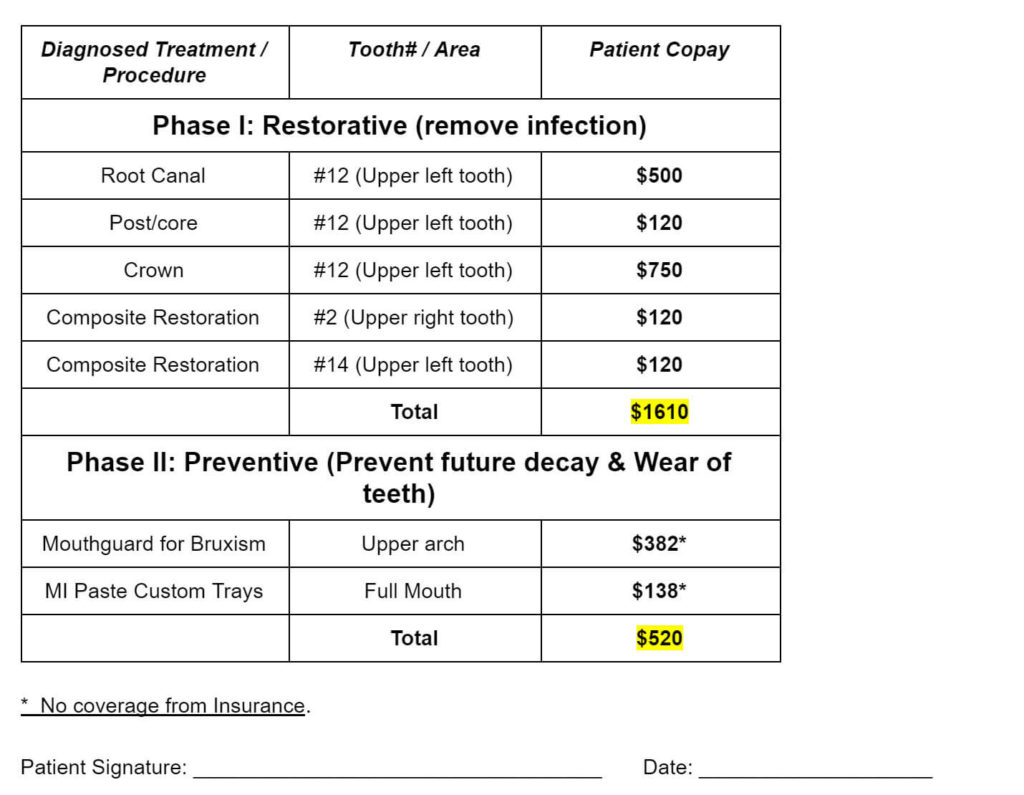
Here the patient knows what each phase of the treatment plan accomplishes. Phase I is to remove infection and restore structure of the teeth involved. Phase II is to protect her investment and to prevent future decay.
I normally don’t like to “itemize” or list out all little details for ONE procedure. For this template, I listed out the post/core and crown – but this patient actually wanted an exact breakdown.
This is what I mean when I say keep your templates flexible – every patient is different. If you have a strict philosophy on not showing all patients any breakdown, you will face resistance from patients where it’s difficult either in getting them to move forward with treatment, or you may just make them angry.
For a simple and straight forward treatment plan like above, you could’ve also printed this same thing from your scheduling software. However, in this case, patient had an individual (self-purchased) Delta plan – which had FIXED copays.
At the time, OpenDental didn’t have a simple way to enter these fixed copays and actually show a treatment plan to the patient without overwhelming them with details they don’t need to know.
You’re probably thinking, how I can possibly provide this at the same time as patient’s first visit?
The answer is, you’re not going to get into your customized treatment plan at first visit. The first visit, you’ll do a comprehensive examination, enter the recommended treatment into the patient’s chart. You’ll tell them exactly what you need to start with at their next visit depending on their chief concern, and let them know at that visit you’re going to go over the entire treatment plan with them – so they understand how their treatment is going to move forward.
At the end of the first visit, make sure to let the patient know how much they’ll be responsible for their next visit for whatever work you’re going to start in addition to finishing up the treatment plan – so there’s no surprises.
In short, let your patients know of all your findings from your examination, but let them know it doesn’t all have to be done at once. You’ll find that most of your patients will be at ease once they hear this from you.
Treatment planning and case acceptance is a subject of a series of posts, so I won’t go into it in more detail here.
How you should keep your dental treatment plan templates organized:
Keeping treatment plan templates for different scenarios will be super helpful for everyone in your office by saving you and your team tons of time.
You can either store the templates in a word document as a local copy on your workstations, such as your front desk, patient consultation room, or the doctor’s office. Or, you can store the templates online on Google Docs, Box, or Dropbox – so they’re easily accessible by anyone you share it with.
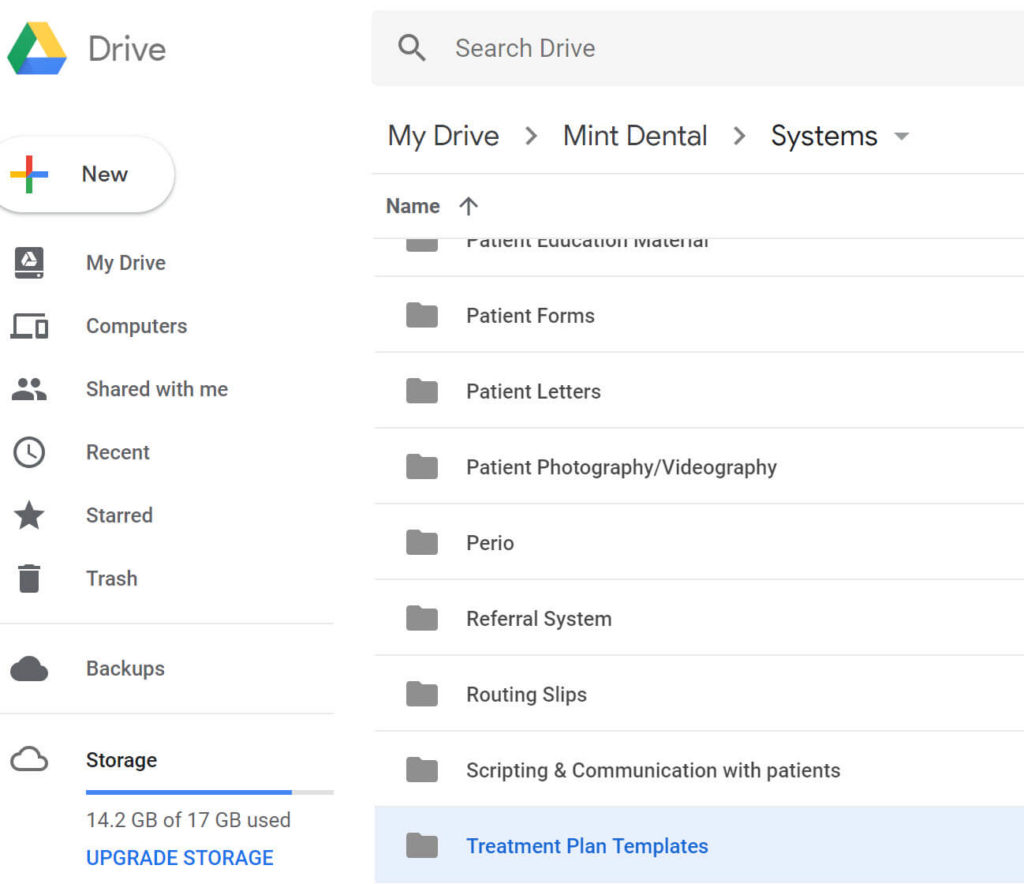
Whether you decide to do it locally on your workstations or with one of the cloud hosted services online, create a folder structure. For instance I have folders created under the main office name “Mint Dental” folder on Google Drive.
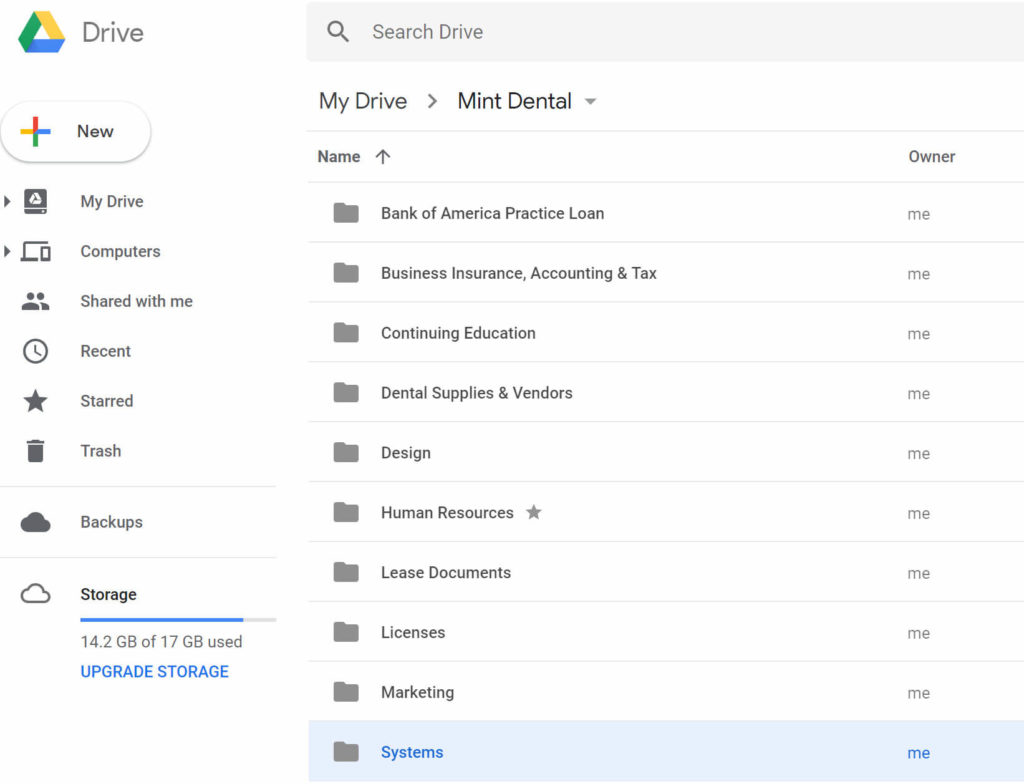
Under the “Systems” folder, I’ve created more folders including the one for “Treatment Plan Templates”. Under that folder, I’ve created folders for patients that I’ve generated custom templates for.
After going through different scenarios of patients with specific treatment needs and financial arrangements, I simply pull up a saved template and edit the fields to speed up my process of coming up with custom treatment plans.
Your Downloadable treatment plan templates:
I’ve included five different templates (each template on a new page), but put it all in one Microsoft word file for ease of access. Once you download it, save each page as a separate file and edit as necessary.
You can also upload onto Google Docs and keep them on the cloud and edit/make copies for different patients.
Conclusion
I hope this was helpful in getting you to think about how you should approach treatment plans that go beyond one or two visits. Download the templates and modify them as you please to help you create custom treatment presentation templates quickly.
As you’re starting out, remember it’s okay to not have someone on your team completely dedicated to presenting cases and financial presentation to patients. Cash is always king, especially as you’re building out your practice in the beginning and trying to keep your payroll expense in control.