The goal of this post is to introduce to you and start the discussion on Dental Office Systems!
You may have heard of “business systems”. You’ve heard it from consultants, business gurus, online forums, Facebook groups – that systems are critical to operations of any business.
As we’re going about our day-to-day activities and routines, sometimes we get so caught up that we lose sense of the bigger picture.
In any business, whether it’s your dental practice or in a restaurant, or in an online business selling eCommerce products – it’s important to zoom out and get a bigger picture of what the patient journey or a buyer’s journey is supposed to look like.
It’s important to look at this bigger picture because it helps you come up with the different “systems” you’ll need to have in place to make sure the patient journey throughout your dental office is a smooth one.
Another goal of this post is to help you understand some “sales” terminology used in the business world – that you may not have heard of in dental school. This will help you when you’re talking to marketing agencies in the future who are trying to explain their services.
And most important of all, you need to learn about the dental office systems, because at the end of the day, you’re a business owner first, and then a clinician.
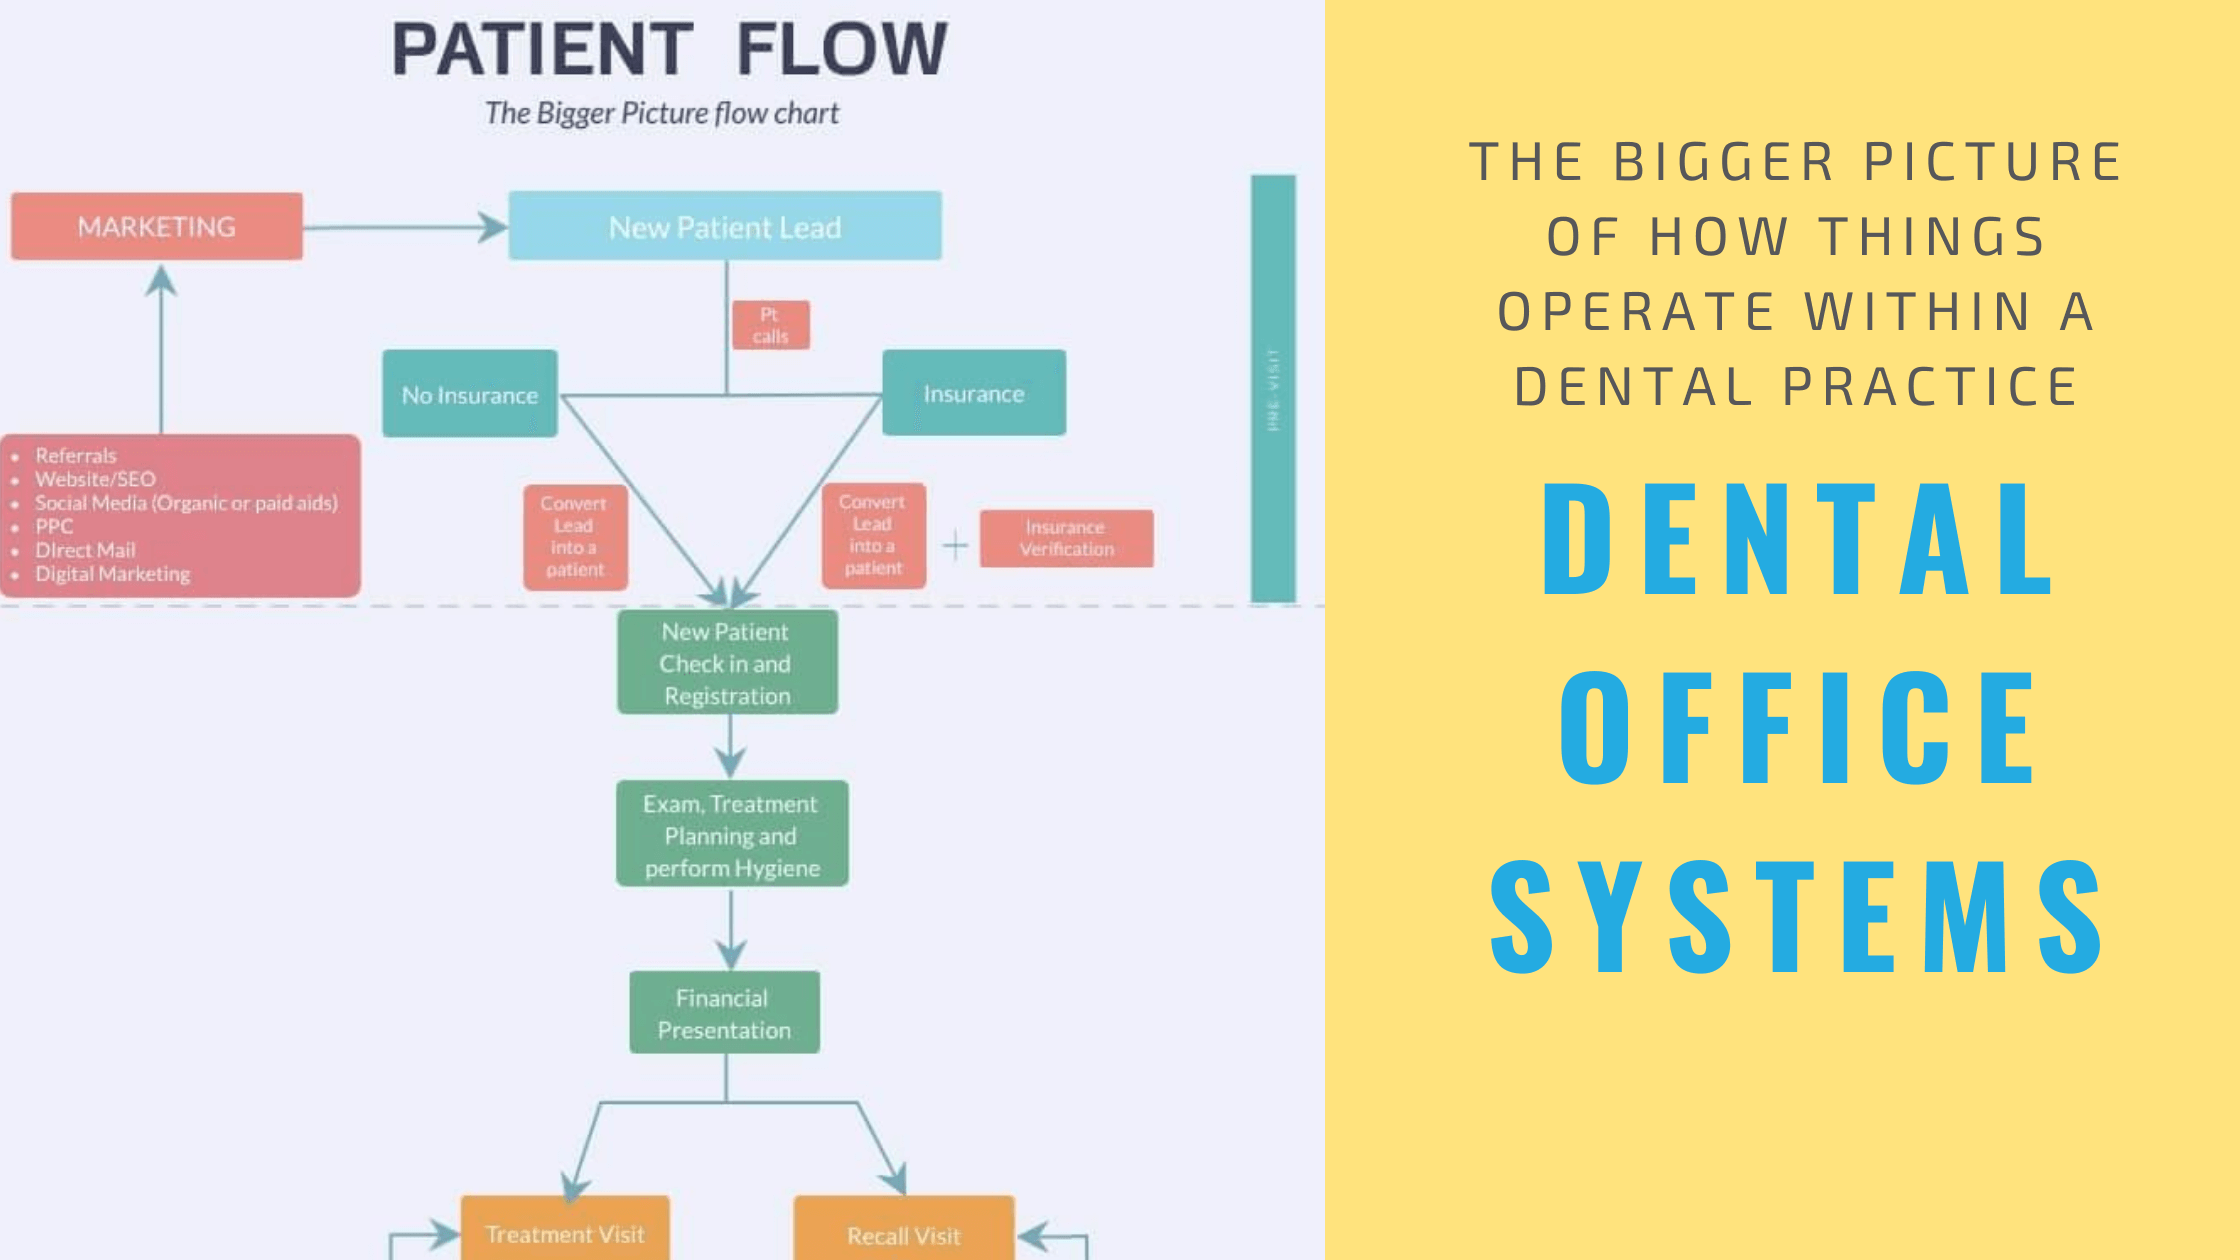
I’ve included a drawing below, but feel free to draw it out in any way you want. Systems are and should be designed for individual practices.
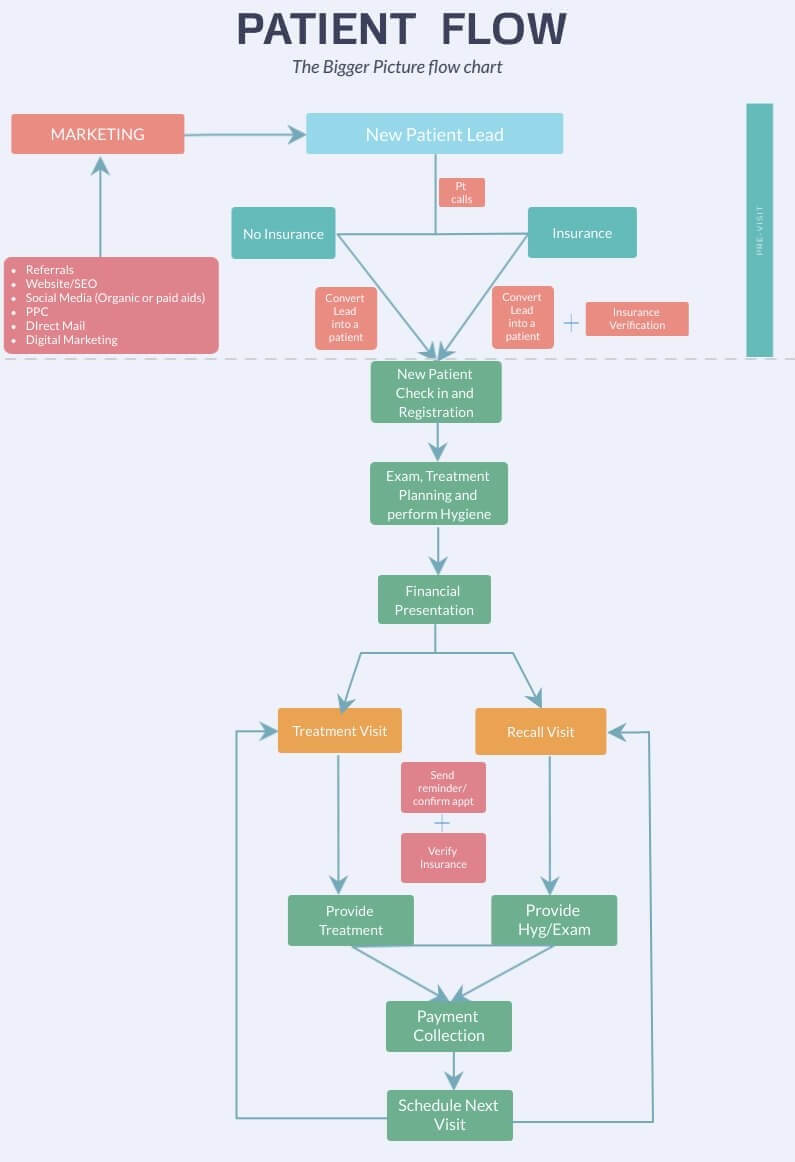
You may expand on this image as you think of the different components that may enhance the entire flow diagram, which may in turn help you in your discussions with your team during training and implementation.
Remember, it’s not necessary to have all the systems in place when you’re starting out. But you should develop and tweak each one as you’re working in your practice.
So let’s start at the top before a patient actually becomes patient in your practice. At this point, they’re referred to as a prospect or a “lead”.
When a patient becomes aware of your services – whether it’s through your paid marketing campaigns or simply through the word of mouth, AND they make an initial attempt to find out information about you – they’re considered a lead.
Their attempt to find out information about you may be in the following forms:
- visiting your website and filling out a “Contact us” form or calling the phone number listed on your website
- seeing your direct mail flyer in the mail and dialing the listed phone number
- seeing your Facebook Ad, then clicking on it and filling out some form whether it’s directly on the Facebook platform, or a form on your website
You get the idea. They haven’t turned into a patient yet, but are looking to get more information and doing their research.
System for following up on New Patient Leads
Although it’s not on the image yet, you may add a “system” which explains in detail step-by-step format how to follow up on patient leads that fill out a form.
Even though they haven’t called you for an appointment, this system in your practice may utilize email, or a physical letter that goes out to the prospective patient.
The goal of this follow up is to “nurture” the lead so you can help them make a decision when they’re deciding on choosing the right dental practice for their family.
If the patients have filled out their phone number where they can be contacted, your team member may reach out and introduce themselves to them know a bit more about the office.
The goal is simply to reduce or remove any objections to the patient scheduling an appointment and making that appointment making process easier for them.
New Patient Phone Call System
This process of “converting” a lead into an actual patient is also a system – where by your office team follows a certain protocol, or scripts of what to say over the phone, or training material to help guide a conversation over the phone to “closing” the call – getting the patient to make an appointment.
You can break this process down further into smaller steps/check-lists.
For instance, in my practice, I’ve broken down the “New Patient Phone Call System” into the following:
- Greeting and asking background questions:
- Taking control of the conversation
- Refer to the patient by their name during the conversation
- Brief dental background: last dental examination, chief complaint, do they require premed?, etc.
- Answering the “Do you take my insurance” question
- Collecting Insurance Information
- Closing the call – making the appointment, making sure they know how to get to office, where to park, avoid traffic, and ask them where they’re coming from and asking them to come in early depending on where they’re coming from
I’ll go into the details of the individual processes above in a separate post, but I wanted to just list it here, so you can define them however you like for your practice.
You may ask why breakdown all these things into steps? Wouldn’t the the team know how to answer the basic questions patients ask, especially if they’re experienced front desk personnel?
Well, if you’ve just hired someone new in your office and they’ve come from other offices with 10+ years of experience, chances are, they’ve already honed in on how to answer some of the most common questions patients ask over the phone.
It may not necessarily mean that it’s done correctly because you may want things done differently in your practice.
But if you’ve discussed with your team how you want certain questions answered then it should be done the way it’s agreed upon by the involved team members and the owner.
That’s why it’s a good idea to always involve your team members when creating and documenting “steps” or “check-lists”.
Every task that is important to the functioning of your dental practice, it should be written out in steps.
Dental Insurance Verification System
Of all the systems in a dental office, for patients who have insurance, insurance verification is an important process that should be completed BEFORE they step into your practice.
Of course, there will be times, this cannot happen. For instance, when you have walk-ins, or when the patient states over the phone they do not have a card, but will bring the information to their appointment when they come in.
How the patient benefits are to be verified on the spot quickly should also be written out if you want it done correctly.
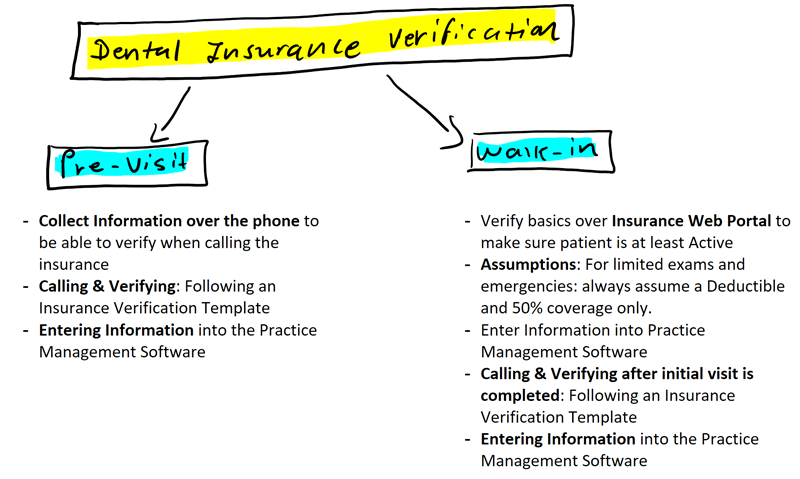
For majority of times, patients’ dental insurance should be verified prior to their first visit to make sure of the following:
- Their insurance is active – you’ll be surprised how many patients don’t know their insurance has terminated, or forgot to request new information from their HR
- Benefit breakdown that includes copays, deductibles, etc – this is so you can find out if they’ll have an out of pocket responsibility for their first visit (usually preventive).
- Avoid surprises with patients. Patients hate surprises. In their eyes, this is simply a convenient service you’re offering. But from a practice management perspective, this is more of a necessity – to ensure you’re going to get paid for your services, and so you can quote patients estimated copays for their treatment plan before they leave.
I will cover the dental insurance verification process in detail in future posts, but remember that if you’re going to be accepting insurance in your practice, this is probably the most important system you can develop that gives you an idea of what you’re going to get paid from patients’ plans.
Once the new patient comes into the practice, every team member, including the providers, will have an important role that guides the patient from check-in, to patient treatment room, to finally checking-out!
New Patient Check-in and Registration system
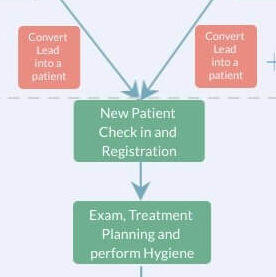
As you may have guessed from referring to the diagram, when the new patients walk in, they’ll be going through check-in and registration. In brief, this is all the paperwork such as Medical History, HIPAA forms, Appointment cancellation policy, submitting a copy of the insurance card, etc.
How the New Patient Check-in & Registration process gets handled may vary from one office to another. For instance, we’re still utilizing paper registration forms for patients, and scanning them into OpenDental.
There are paperless solutions where patients fill out the info on the tablets, and information is transferred directly into the practice management system.
Regardless of what methods you utilize, each step needs to be written out.
Once the patient has completed registration, there’s usually a “hand-off” that occurs. This simply means that now the clinical assistant either comes out to the front waiting area, or the front desk personnel escorts the patient to the back area to meet the clinical assistant – who then brings the patient to the dental operatory.
What happens next may also vary in different practices. A new patient either gets seen by the dental hygienist, who will review Med Hx, take necessary dental xrays, do a general cleaning.
Some practices have implemented an assisted-hygiene schedule – whereby a dental assistant usually works along side of a hygienist. This means the clinical assistant takes the xrays, turns the chair over, sterilizes hygiene instruments, etc. I’ve also transitioned to this style of practice since the last year.
If there’s no hygienist, the doctor sees the patient first, does the exam, provides treatment plan, and provides the hygiene treatment at the end of the appointment.
Which process is better depends on the type of practice you have, the size of your patient base, and your ability to provide enough patients to the hygienist to be able to afford an assisted-hygiene schedule. This also is a matter of another post.
For now let’s assume you’ve started out recently, there’s no hygienist in the practice, so you’re doing your own hygiene.
Exam & Treatment Planning system
It always helps to have a process in place that you’re used to following, so you can go through the order to prevent missing important steps.
You may already have one established since coming out of dental school, during residency or working in your associateship.
This is not about going into detail of HOW to treatment plan. That’s a science in itself, where you will continue to take CEs throughout your career to add to your “arsenal” of all the things you don’t know how to diagnose.
In my practice, I’ve been following this same process:
- On the days my hygienist is there, after medical history has been reviewed and xrays have been taken by a dental assistant, a cleaning is always done first.
- Then, I do a clinical exam while talking out loud of my findings. As I’m doing this, I’m also just writing down teeth numbers with the treatment plan for the tooth next to it – just on a piece of paper behind the patient.
- Right away, I do intra-oral photos with the intra-oral camera. In some cases, I’ll grab my SLR for larger cases.
- Start reviewing Xrays with the patient with the right wall monitor on – so the patient can see them. (For multiple screens setup in a dental operatory, refer to this post on how to set up your operatory for increased Case Acceptance and Patient Entertainment)
- Come back to the intra-oral photos and go through them in detail and explain what we’re seeing on the pictures and what needs to be addressed.
- As I’m going through xrays and the intra-oral photos, my clinical assistant is transferring the treatment from the piece of paper onto the patient’s chart on the practice management system. I don’t worry about which order it’s going in. I can organize that later as I’m going through it with the patient.
- Once xrays and photos have been reviewed, I simply pull up the treatment plan in front of the patient on the screen, and go through it with the patient – and prioritize treatment in order it needs to be done.
Once the treatment plan has been explained to the patient, next is going over the finances – let’s label this as the Financial Presentation system.
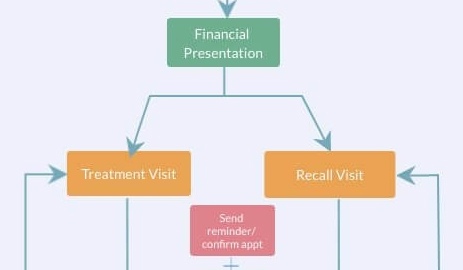
Financial Presentation system
In my practice, I do what most consultants tell you not to do and what most doctors don’t do – I discuss the finances, right in the operatory.
It doesn’t take long, I’ve been doing it since the day I opened – it has never caused an “issue”, nor has it caused any inefficiencies in my workflow.
Most will tell you that your time can be used better doing more dentistry. But let me tell you, if there’s anyone who can help patient make a decision to move forward with dentistry you’re recommending – it’s YOU, the doctor!
If you feel you’re uncomfortable talking about finances, it’s normal to do so in the beginning. I felt the same. But as you do more and more, you’ll improve.
You’ll get to learn patient psychology as you learn to talk to patients with different backgrounds, with different problems, of various age groups – master communicating with your patients, and you’ll reduce a whole lot of stress over long term. I’ll go into detail of how I do this in future posts as well.
Moving on, if patient doesn’t schedule right away – we utilize custom treatment plan templates where it’s easier for the patient to read and understand in writing what you’ve already told them verbally in the operatory.
I’ve discussed this in the following two posts, and you may want to reference them in case you haven’t.
- Patient Financial Policies & Payment Options
- Financial Arrangement & Treatment Planning (w/ Downloadable Templates)
After you’ve discussed finances with the patient, or let’s say you have a treatment coordinator or an insurance coordinator responsible for discussing finances with patients, it’s time to schedule their next appointment.
I follow one simple rule in my practice – which is every patient should have a next appointment on the schedule – whether it’s for work you’ve treatment planned, or it’s their next recall, or both.
There’s an exception to this rule, however, if a patient has a tendency to cancel last minute multiple times without any notice.
If the patient needs work, you want to make sure you schedule their next appointment in a timely manner to get the patient in as soon as possible.
There are many different approaches you can take when it comes to scheduling appointments for patients.
System for Scheduling Dental Appointments
In my practice, appointments for work are scheduled right in the operatory. This is to prevent bottle neck at the front, especially if you’re working with one front desk personnel. The only appointments that are made at the front are recall appointments.
The other reason why I do it this way is to make sure patient is not waiting too long before they come in for their next appointment for work. This way you’re letting the patient know that it’s important they get this done in a timely manner.
For instance, if I usually schedule an hour for a crown appointment, but there’s no slot open for an hour for next three weeks, I can “squeeze” that patient into the 45 minute slot that’s open next week because I know the patient coming right after usually comes late by a few minutes.
And sometimes, the opposite can happen. There are times, I’ll let the patient know their next appointment will be scheduled at the front – but then my scheduler knows that I need an hour, but she’ll try to squeeze the patient in for 45 minutes open slot next week.
But I KNOW the patient needs the extra time – due to clinical reasons – either they can’t open for too long, they need frequent breaks, collect too much saliva so needs the suction all the time, etc…
These things WILL happen. It’s not the end of the world, but no matter how much you plan, you’ll deal with it at the time it happens.
Normally, “routing slips” are used in practices which helps you communicate appointment information to the front desk personnel. It will contain information such as – what the patient is supposed to come back for, how long you’ll need for the appointment, etc.
I do not use paper routing slips in my office, I utilize Slack to directly send messages to my front desk regarding their next appointment information. Avoid using patients’ full names, so we usually state just the first name and initial for last name. “John D. needs to come back for a crown for an hour, but 45 min is okay..”
Prior to the patient coming in for work, you always want to make sure they’re aware of what their out-of-pocket payment responsibility will be. If you’ve followed the order in the picture, you should’ve already done this at the point of presenting finances to the patient.
So continuing the flow diagram above, a patient is scheduled to come in for treatment. At that appointment, once you’ve finished working on the patient, again the next appointment is made – either for their recall visit or for their next treatment planned work appointment.
The assistant then walks the patient to the front desk area for check-out. At this point, there should be no surprises when your team tells the patient their out-of-pocket responsibility for the work that was completed today.

System for Collecting Payment
Payment collection is also another important system that should be in place for your practice that lays out different third party payment plan companies you work with (Lending club, CareCredit, etc.), in-house payment plans, in-house membership plans, etc.
You should also include in writing – not just for training your team members, but also in your financial policy how payments are to be made for things like crowns, bridge, implants – or other visits that require multiple visits to complete treatment.
For instance, we ask the patient to pay in full at the time they come in for crown prep prior to sending the impression out to to a lab.
If the patient has insurance, their co-pay is collected in full at the time of the prep visit.
There are times patients want to pay only half at the prep visit and the rest of the balance when the crown is inserted. In my practice, I’ve allowed this since day one, but I’ve made sure to discuss with my front desk personnel, so they know it’s okay for the patient to pay the balance at the insert visit.
There will be times when you’ll need to allow for some “flexibility” for your payment terms. For instance, for the more established patients in our practice, we’ve allowed crown & bridge payments to be made over two months – but of course, always, with a written agreement.
System for Appointment Confirmation and Reminder
Most patients don’t answer the phones during the day. They simply just don’t have the dentist number saved on their phone.
Texting and/or email need to be utilized to reach the patient to remind and confirm appointments. You should assume patients just don’t remember appointments. There are some patients who your team member will call, send a text AND an email – and even after confirming the appointment – just do not show up because they forgot.
But regardless, a proper system needs to be in place for how often you text/email/call the patient for appointment reminders.
Here’s how I do it in my practice:
Everyday in the office, we will make sure patients that are scheduled up to three weeks out from today have received a text message to remind them of their upcoming appointment.
For patients that are coming in for treatment, especially an appointment that is hour or long, we will call and leave a voicemail to remind them. For appointments that are made just recently, we don’t call or send a text.
Each Practice Management System marks patients differently depending on whether or not patient is confirmed.
So everyday, your front desk has an eye on who is confirmed and who is not. If a patient on schedule tomorrow is not confirmed, has never reached out to you, then we will give that slot to someone who calls and wants an appointment.
There have been times when a patient just shows up without confirming, and there’s another patient in their slot who actually made an appointment. This WILL happen to you, there have been few patients who have gotten upset.
But your team at the front should have in their records and communication log entries in the patient’s chart – that a text did go out, or an email was sent out, or a voice mail was left asking them to confirm.
If a patient shows up to their appointment without any confirmation or response to our email/text/phone-calls – we tell the patient that we are by appointments only and we do need confirmations.
Always stick to your policies, in rare cases, depending on the patient, I bend the rule and make room for the patient if they’re willing to wait to be seen. This will depend on you, the type of patient it is, etc. – only YOU can make that decision at the time the situation arises.
Recall Appointment System
Your recall system is another critical component that will keep you (the doctor) as well as the hygienist busy in your practice. Hygiene production can account for one-third of all the production in your practice and even more depending on how established your hygiene base is.
To make it easier, you can break the recall system down into smaller components.
- What happens during a recall visit
- Reminders for recall patient appointments
- Pre-scheduling patients for their next recall
Perio maintenance vs Prophy
Perio maintenance is usually done once a patient has a history of periodontal treatment like full mouth scaling and root planing, for instance, and you’re bringing the patient back every 3-4 months instead of the typical 6 month visit for a prophy.
If you’re going to be accepting PPOs, it’s important to discuss with the patient how perio maintenance visits are covered if you need to bring the patient back for scaling and root planing.
Why is this important? Because if they’re used to paying no copay because their plan covers preventive visits at 100%, and now you bring them back for a perio maintenance visit, and upon check-out, they’re asked to pay a deductible and the copay, some patients just won’t be happy.
Most patients are okay with it as long as you’ve explained to them in advance.
Unfortunately, sometimes no matter how much you’ve explained to them the difference between perio maintenance and a prophy, they forget and are still surprised when they see they have a copay for perio maintenance.
What happens during a recall visit?
- Reviewing medical history and updating it when necessary
- Emphasizing work that is still not done because patient never scheduled
- Clinical exam – which includes thorough intra-oral and extra-oral exam. Spot probing and updating perio charting, providing fluoride treatment when necessary, oral hygiene instructions at the end.
How long of an appointment should this be for a hygienist?
This is subject to varying opinions depending on the type of practice you have. I have an assisted hygiene set up where I have an assistant for the hygienist, whose primary responsibility is to turn over chairs, bring patients in and out, and take xrays – so the hygienist can concentrate on actually providing preventive care.
We set aside 45 minutes for a recall patient (regardless of whether need xrays or not), and 1 hour for a new patient. If it’s a new patient, they will have additional 15 minutes in a separate operatory under my schedule. So 45 minutes for a recall patient, and 1 hour 15 minutes for a new patient.
Closing remarks . . .
I hope this was a good overview for you in understanding how different “systems” play a role during in the patient life cycle in your practice.
Marketing is important for bringing new patients into your practice. But making sure they stay in your practice is just as important. As you get busier in your practice, without properly implemented systems and written protocols, LOT of patients are just going out the “back door”.
This simply means that the patients which cost you marketing $$$ to get into your practice, are not coming back as often as they should.
Majority of the times, this can be reduced drastically by having a proper follow-up system established in your practice.
Moving forward, I’ll get into the specifics of the various systems I’ve implemented in my practice.