This is a second post to continue on the topic of predeterminations. Hopefully you’ve read the previous post – Predetermination of Benefits For Dental Insurance – What You Need to Know to Avoid Insurance Delays, and understand the basics of what predetermination is and why it should be done.
Although there are some guidelines that should be followed for the sake of simplicity for your front desk personnel, there is flexibility from the implementation standpoint.
You may decide to receive a pre-estimate for EVERYTHING that you decide to do on a patient. Although impractical, since you’ll be delaying treatment for simpler restorative procedures – there are some plans that you do need to send in a pre-d because they follow a different fee schedule than what you expected.
Because of that there’s no way to tell what insurance will pay towards procedures.
For instance, I had a delta dental patient in our office – whose plan did not follow the delta ppo fee schedule as we expected.
When my front desk asked which fee schedule the plan follows, she was informed by the rep that her local employer has a “separate assigned fee schedule”. I had never heard this before.
After contacting the patient, she was advised by my front desk to check with her human resources department to find out about this.
She had no idea and the HR was taking their time in getting back to us. We advised the patient that to properly determine what her out of pocket cost was going to be for the fillings, we had to send in a pre-determination for all procedures.
If she wanted to move forward right away, she would pay the in-network fee (maximum allowable) assuming no insurance reimbursement. Afterwards, a claim can be filed with the insurance and the benefits the insurance provides will be credited to her account.
Every office develops its own process when offering predeterminations for their patients. I have a routine that I follow that works well for my office, and that’s what I want to cover in this post.
Let’s dive right in.
Best Practices:
Know which plans in your office give you most headaches:
In my office, I have quite a few patients that have United Health Care (UHC) PPO. When I first started seeing UHC patients, I would quote them their out of pocket assuming UHC PPO fee schedule we have entered in our system. But after receiving EOBs, the payments were completely different than what we expected.
Carefully looking at the EOB, I realized a lot of UHC plans are underwritten by Careington PPO (which I’m in network with also), so it follows the Careington PPO fee schedule. This has been the trend with many other patients I saw thereafter who had coverage by UHC.
There have been times UHC has denied our SRPs for reasons I cannot understand. I typically do not send in predetermination for full mouth SRPs, but for any UHC patient, I ALWAYS send one in – even for simple restorative, so we can quote patient’s out of pocket accurately.
I’m not sure what your experience is with UHC, but for my office, I will always send in a predetermination document for any treatment that needs to be done.
Union plans: I accept some union plans that pay relatively well for services at 100% coverage with no out of pocket expense from the patient.
Yes, there’s a slightly higher write-off I accept with these plans than other major PPOs such as metlife, cigna, delta, etc. But the number of patients I have with these plans and the rate of acceptance I get with my presented treatment plans – far outweigh the impact from the higher write-off.
But these plans require me to send in a predetermination for root canals, crowns, bridge, implant, dentures, etc. Accepting these plans requires more administrative work on my end, but it keeps me productive!
Over time, I’ve developed templates that allow my front desk to put together all the required documentation relatively quickly.
When sending a predetermination to an insurance, ALWAYS give them everything they could possibly need – so they don’t keep you waiting for three weeks to get back to you to tell you “we need additional information to process your predetermination”.
Review all the recommended documentation you should send from the chart in my previous post.
Have narrative templates for necessary documentation & x-rays:
It’s much quicker to have these templates ready and edit them as needed for different patients. It’ll take your time in the beginning, but once you have it in place for your practice, you’ll be utilize them on an ongoing basis by simply editing them for different patients.
Your team can easily replace the data in the templates and reuse them for different patients.
I store these on our office Google Drive account, which is also easily accessible by everyone on the team.
These templates are not always necessary.
For most plans, you’ll be able to utilize your 3rd party claim software to quickly submit xrays and other documentation.
However, you’ll find that some plans you accept will give you a headache requesting the same information you’ve already submitted via the software to attach to the claim.
If you have these templates, you can either mail it along with the printed out claim, or send it as a “narrative report” in the claim attachment software.
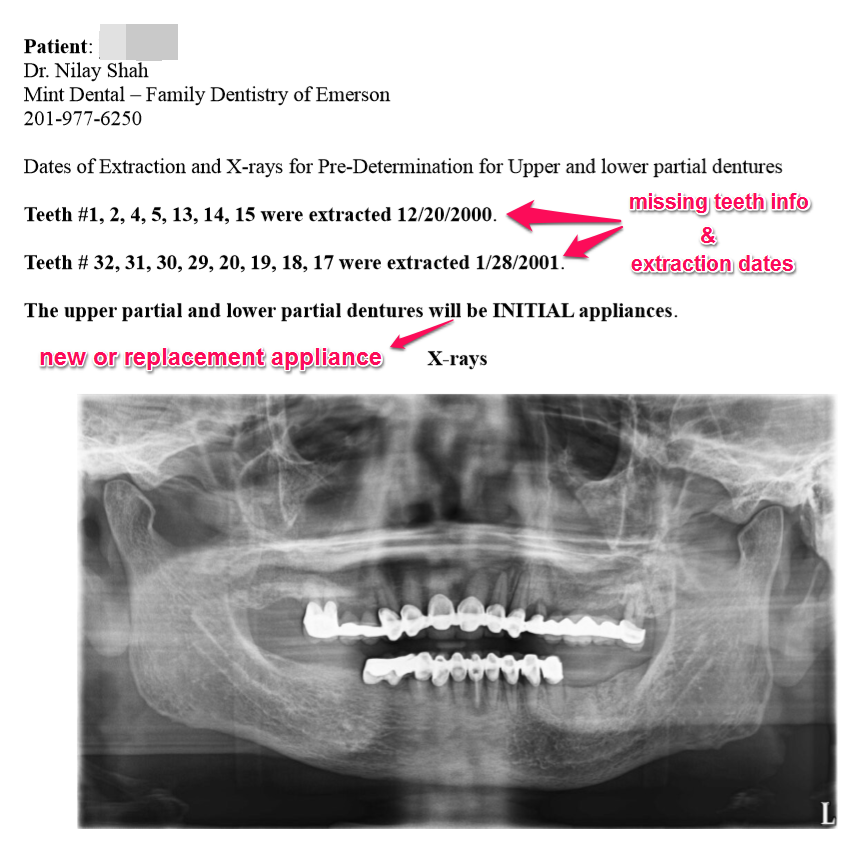
Here’s a simple template that I use for dentures that provides all necessary information to the insurance:
Missing teeth #’s
Dates of Extraction of teeth being replaced
New or replacement appliance
Necessary x-rays – PANO or FMX
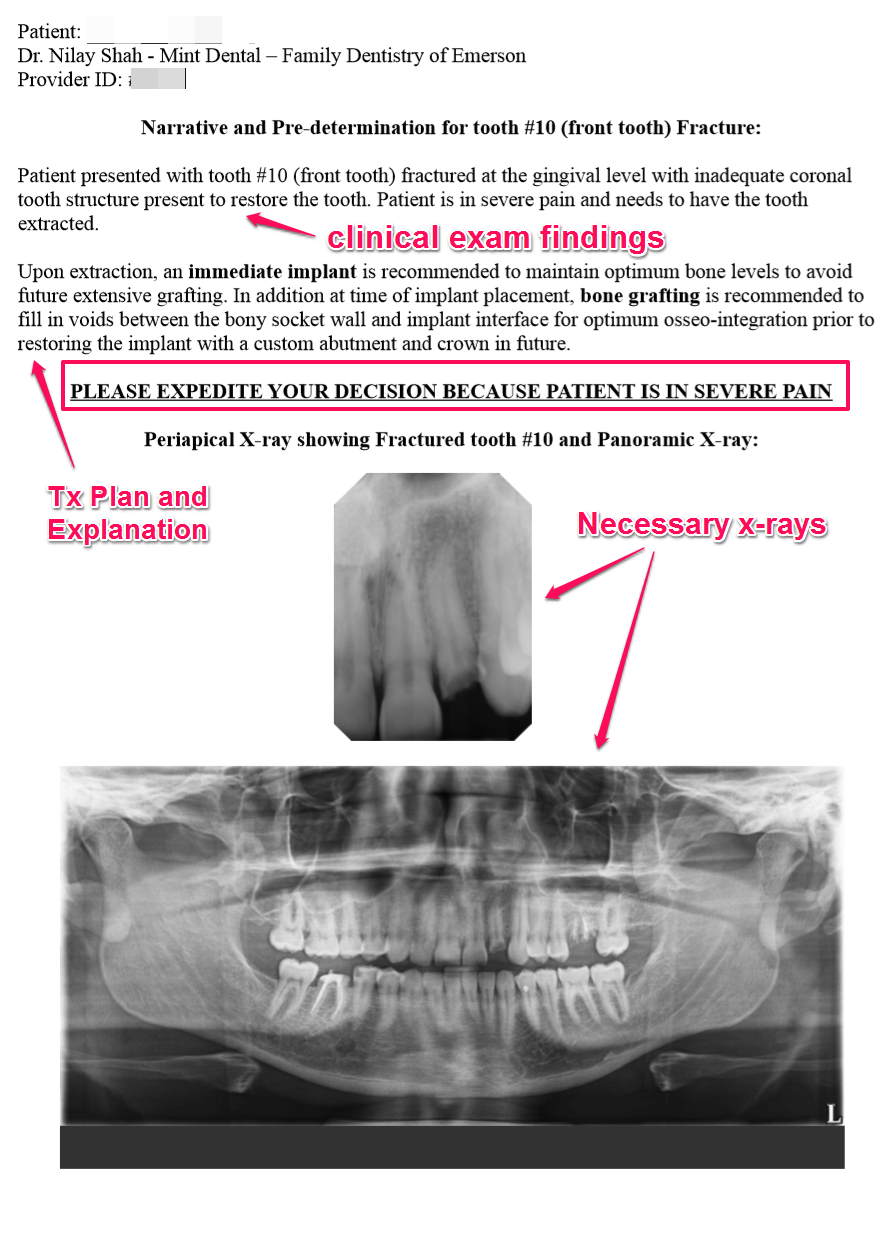
Here’s another narrative I wrote up for a patient tx planned for extraction / immediate implant / bone grafting
Sending the Predetermination claim to Insurance:
You can send the claims electronically through your Practice Management Software or by physically mailing the required information to the insurance companies.
1. Send electronically through integration of your Practice Management Software (PMS) to a third-party clearinghouse to receive your e-claims. I use DentalXchange for e-claims in my office along with their included Attachment Service to send required attachments.
You send preauthorizations the same way you send claims from your practice management software.
When a claim requires supporting documentation, the 3rd party claim software should tell you what’s required to process the claim.
This should be done on a daily basis. When you’ve sent the claims at the end of the day, for instance, when I log into DentalXchange next morning, it lets me know which claims need attachments – this will include claims for service and also preauthorization claims.
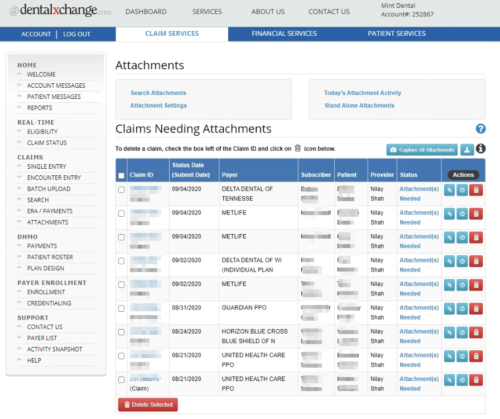
Once you click on the “Capture all Attachments” button – it opens up DentalXchange’s Desktop application that lets you upload the supporting documentation to attach to claims. (you need to have the application installed on the computer you’re going to do attachments – so have this installed on whichever computer your front desk team is working off of – you can install it on multiple computers also)

From this point on, you’ll be able to double click on each patients and bring up a window to take a screenshot to attach x-rays, narratives, periodontal chart, etc.
If you’re just getting started with this, call up DentalXchange support, and have them go over with you how to send claim attachments. To make it easier, do it together with your team member who’s responsible for this task.
2. Mail / Fax a Predetermination claim (generated by your PMS) along with supported documentation directly to address on file for insurance
I do not send all of our predeterminations electronically. There are some plans I’ve had trouble with in terms of attachments getting lost – specifically with United Health Care.
There have been times where I’ve sent MetLife and Aetna predeterminations for dentures electronically and the attachment software sends me a request for attaching required narrative and x-rays.
I would list the required missing teeth information and extraction dates in the “narrative” section of the software. After two weeks, I get a response in the mail indicating – they need more information regarding missing teeth and the dates of extraction.
After getting that a few times, I’ve let go of the electronic option when it comes to predeterminations and I just mail everything to get everything delivered to some of these plans fast.
Again, you’ll know which method works best with which plans once you start to work with them.
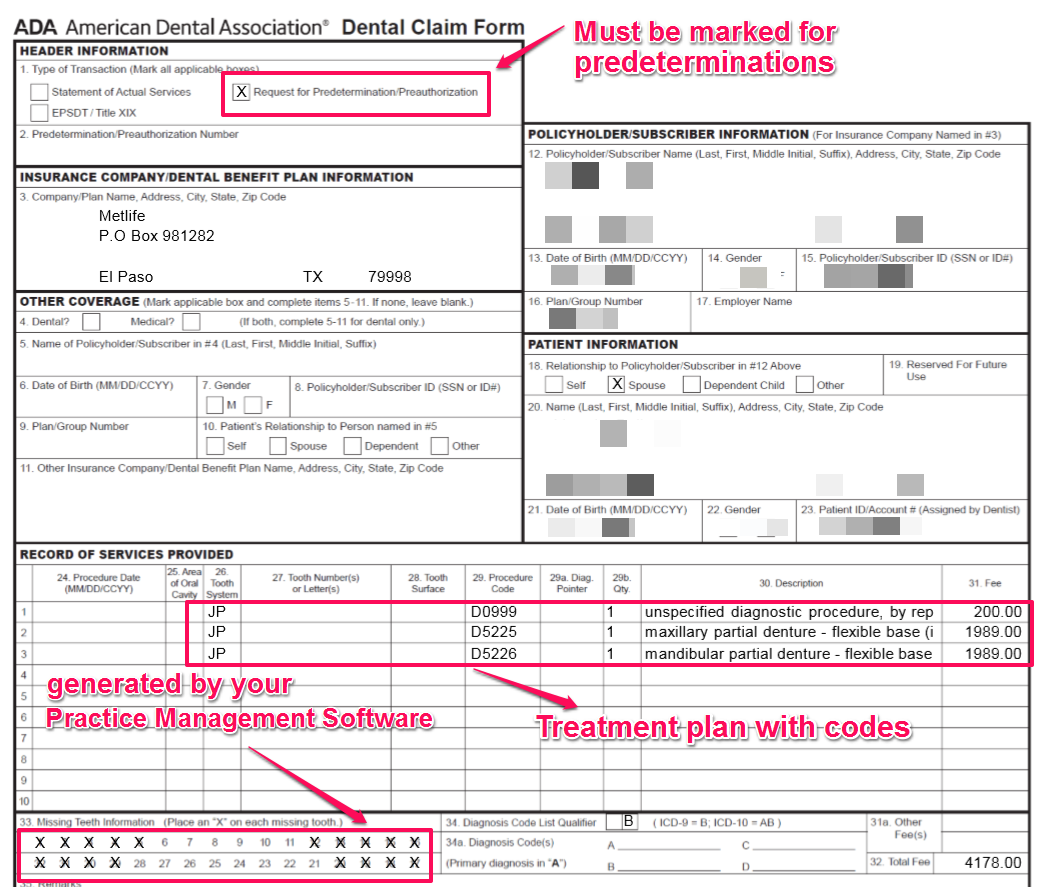
For instance, for the patient needing upper and lower partial dentures, I would fax the template you saw earlier in this post above along with the actual ADA predetermination claim (shown below) directly to the insurance.
Putting it all together
Learn to do this yourself first as the practice owner
Yes, I know what you’re thinking:
“When am I ever going to have time to do this when I’m seeing patients?”
“Why would I need to learn this when my team is going to be taking care of this anyways?”
Yes, you do want your team to be taking care of this task. But to have it done right and to standardize the entire process to prevent delays in processing and payments, it’s best to be involved in this whole process yourself as the owner first!
If you’re just getting started in your own practice, try sending attachments yourself. If you don’t know how to do it, as I discussed before, call up the support people at whatever software you’re using for sending claims and attachments – you’re paying for it anyways!
Standardize the process of gathering supporting documentation
What do I mean by this?
Let’s look at some examples: Even though insurance companies don’t require pre-operative intra-oral photos for crowns, for instance, get in the habit of taking an intra-oral shot of that large amalgam restoration that you’re recommending a crown for.
When the photo is saved in the patient’s chart, your team member knows how to get the photo and that he or she needs to submit the pre-op photo along with the pre-op xrays for the crown claim to be paid.
Some plans don’t require the approved preauthorization to be submitted as an attachment when the procedure is completed and the claim is generated.
By having a standardized process for your training where your team knows that they have to attach the approved copy of the preauthorization to the claim for that service, they no longer have to remember which plans do and which plans don’t require this!
It just makes your team’s job easier!
Delegation in a Lean Practice
I’ve only had one front desk ever since I did my startup, but she knows that her most important job in the practice is to keep the schedule full. Everything else in her job description, although important, has a lower priority than keeping the schedule full.
In between patients when I get time, I go into my office and send attachments myself because I know she’s either on the phone or working on her daily follow-ups to get patients in.
If you never learned it yourself, you won’t know how to fix the inefficiencies that may exist in this entire process.
And when things go wrong, it leads to claims not getting paid, or getting paid less than what you expected – adding to your A/R (Accounts Receivable) reports. Now you’ll have to come up with time either for your team to tackle this issue by following up on claims, or hiring an outside agency to clean up the A/R.
This is just bad for business! – You already took a discount when you saw these insurance patients in form of write-offs! Now you have to spend ADDITIONAL capital either when you delegate time for your team (human resource) or hiring another agency to take care of this issue ($$).
Have proper systems and standardized processes in place – and your A/R reports will be minimal to non-existent!