When your team is faced with the task of dental insurance verification for a new patient – the job can easily take up 20-30 minutes for each phone call with an insurance rep.
Multiply that time by the number of new patients you get in your practice – that’s how long your team will be on the phone! Don’t forget verifying certain benefits for the recall patients will also add additional time.
When you have such a repetitive task, it makes sense to figure out proper systems to put into place to make this process quicker.
This is part two on dental insurance verification. If you haven’t seen part one, I strongly recommend you watch that video first – and then come back to this post, especially if you’re trying to understand the basics of verification, such as terminology, what you should be asking for, etc.
After you’ve been doing this for awhile, you develop patterns, you get to learn what certain insurances cover, what they don’t cover, what information they ask for when you’re trying to submit predetermination, etc.
From these repetitive patterns, you can tweak your existing systems or process of verification for speed.
Instead of filling out the whole template, like I discussed in part one, I’m going to cover in this video exactly how I approach insurance verifications today in my practice.
Using Open Dental “Plan Note” on Edit Insurance Plan Window
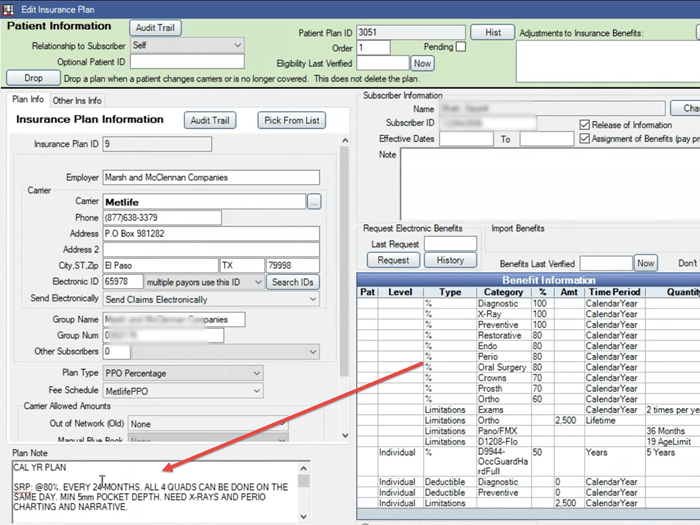
Here’s the family module of open dental for this specific patient.
And as you scroll to the bottom on the right side of the insurance information, you’ll see the insurance plan note in red, so it stands out and these are all the things that I want to know for every single patient.
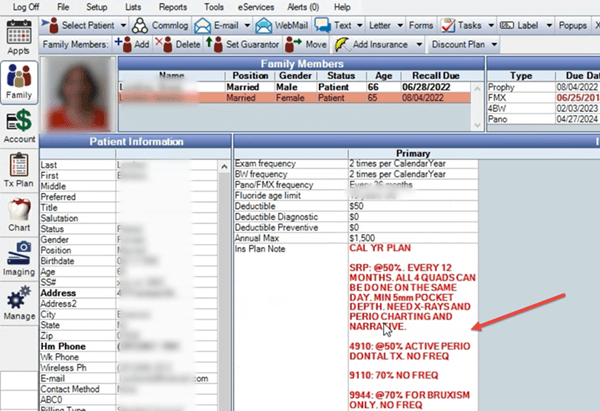
And I can access this information from anywhere I have access to Open Dental, which should be from all the operatories as well as the front desk.
Whenever I’m treatment planning anything for a patient – right from the chair, I can look at this information and see what the coverage is for a mouth guard, what the emergency code coverage is, if there’s any frequency or any history of usage, or whether or not there is a missing tooth clause. I’ll also see the last time this information was verified because we always leave a date.
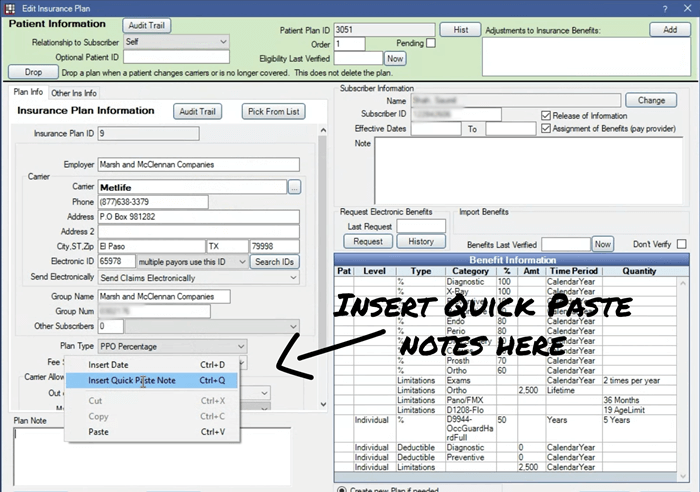
So there’s something else you can do. You can use open dental’s built in custom benefits tool from the edit benefits screen. So if you click anywhere on the right side here, this is the edit insurance plan screen and in the bottom right – there’s the benefit information. Go ahead and click into that.
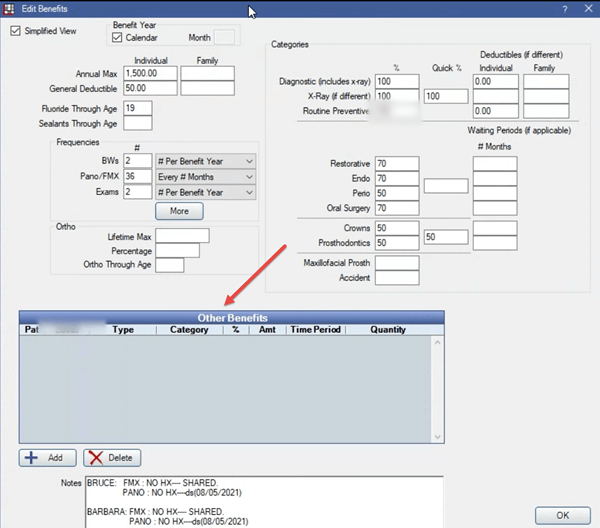
And right at the bottom says “Other Benefits”. Here you can enter codes for procedures that don’t fall into the categories you see above or in cases for example, let’s say insurance tells you that they cover D7953 – only at 50% while oral surgery procedures are covered at 80%.
Or if you need to enter a different coverage for mouth guard, for example, like a D9944, – you can enter those codes here.
So the way you would do that is you go into you click add. And then make sure your category is none. And you can just put in D9944. Let’s say it’s covered at 50% and time period is lifetime, and then click Ok.
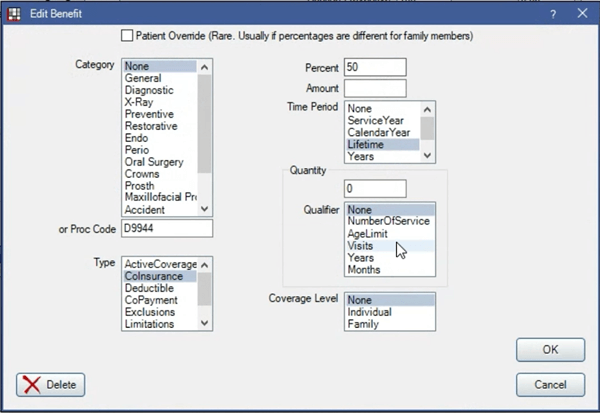
And then you could add another one, let’s say emergency visits D9110. This is covered at 80%.
So now you will see those two codes show up right under here. Now you could do this for multiple codes, that are in addition to what you would see in the general categories information here.
If you’ve got one or two, it’s fine. This is also going to depend on how fast your front desk personnel doing the insurance verification can enter these at a time.
But if you’ve got multiple, I feel like I just find this process to be a little slow. So instead, in my practice, I use the insurance plan note, which you can enter right at the bottom left section.
So let’s go over how we collect information before getting on the phone with the insurance rep, because ultimately the whole goal of this is to reduce the time your team spends on the phone with the insurance rep.
Using Dental Insurance Web Portals
The first step is going to be logging into the insurance portal so you can get as much information as possible, so you can fill out the edit benefit screen on Open Dental.
So here’s a view of the insurance portal for Delta dental. Once you’ve logged in. Go ahead and look up a patient by their last name and date of birth. And then you come to the following screen to keep this process fast.
Hopefully you’re using dual monitors at your front desk area or wherever you’re doing insurance verifications. So on one monitor, you’ll have Open Dental and on the other monitor, you should have this insurance portal open.
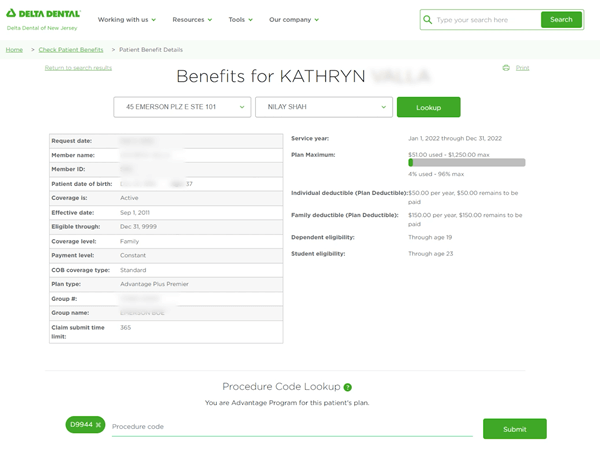
Once you’ve logged in and you’ve pulled up the patient – at the top, you can see the basic benefit information: how much they’ve used, the, the plan maximum, what their deductible is, etc.
Okay, I’ll come back to this section of procedure code lookup in a second. So as you scroll down, you’re gonna be able to see all the different benefit information that’s available. Go ahead and quickly use this information to fill out as much information as possible on the edit benefits screen on Open Dental.
What I like about this portal is what I said earlier – the procedure code lookup. So for example, specific codes, like your mouth guard code, the D9944. If you put it in and you hit submit, you’ll get the information you need. That’s not available at the bottom here.
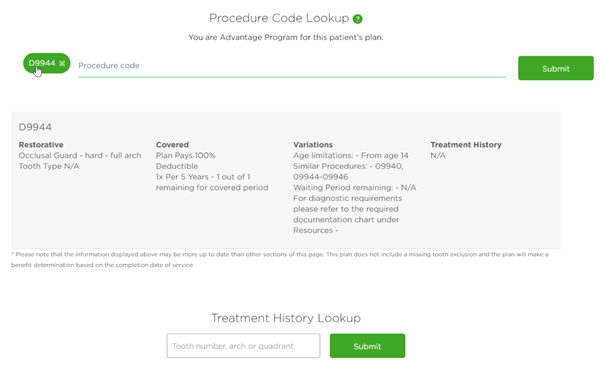
The plan is going to pay at a hundred percent. There is a deductible that applies and you can do one every five year, which means the insurance will pay for one every five years. And here’s also the other stipulation, which is the age limitation. There is no waiting period for this procedure code.
Now you can also look up additional codes such as in my case, we also look up D4267, which is the non-resorbable membrane, the guided tissue regeneration. In this case, the plan pays a hundred percent and the deductible does apply.
Just make sure you have a proper fee schedule code connected for delta dental for this code in Open Dental. So the benefits are calculated properly.
Keep in mind that not all portals look the same and not all of them offer the same functionality. So what you should do is you should get familiar by logging onto these portals, and you should know where to look, so you can get this information as fast as possible.
Utilizing Fax of Dental Insurance Benefits for Verification
Next we’re going to request the fax of benefit information for the patient. Most of the time you don’t have to speak with the insurance rep to get a fax. You can actually go through some sort of an interactive menu and request the fax. So here is an example of a fax from dental dental.
Notice at the top, you’re going to get the basic insurance information such as maximum, deductible, how much is remaining, how much they’ve used as of the date of request of the fax, etc.
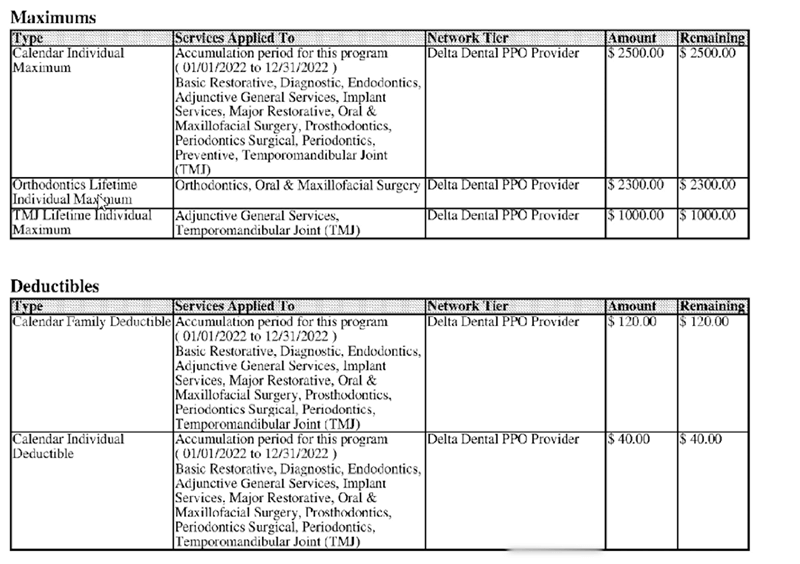
You’re also going to get information on the waiting periods, such as, for example, this fax says that this plan does not have any waiting period.
As you scroll to the bottom, you’re going to get the percentage information on your major categories. And hopefully you have this open on two screens. So as you’re reading this, your team should be filling out the Open Dental edit benefit screen at the same.
If you scroll down to periodontics, for example, for code D4341, it says that it’s covered at 80% and there’s a limitation of one per quadrant within a 24 month period.
But what it doesn’t tell you is that it won’t let you do full mouth scaling in one visit. So this specific plan does not let you do full mouth scaling in one visit. They want you to split it up.
And this is something that you find out from the rep, but once you’ve worked with few of these plans, you won’t even have to ask that because you’ll know it just by looking at the plan that you can’t do full mouth scaling in one visit.
Between the fax and the online portals, it gets us about 90% of the information we need to fill out the benefit details for a family or for patient in Open Dental.
Remember, the goal is to minimize the time on the phone. So any information you don’t get from the fax or online – those are the things you should leave for the insurance rep on the phone, and these should only be a few things.
Using Open Dental’s Quick Paste Notes for creating small templates
To note down any specific stipulations in details we get from the insurance rep, the online portal or the fax – we use Open Dental’s built-in quick paste notes to create small templates that are very specific to my practice.
And here’s how we do that. On the edit insurance plan screen on the left side, there’s a plan note. Right click in this panel and click on the insert quick paste note.
We have this quick note generated for insurance benefits. So go ahead and double click on it to add it. So here’s the note we have, I’m going to double-click it.
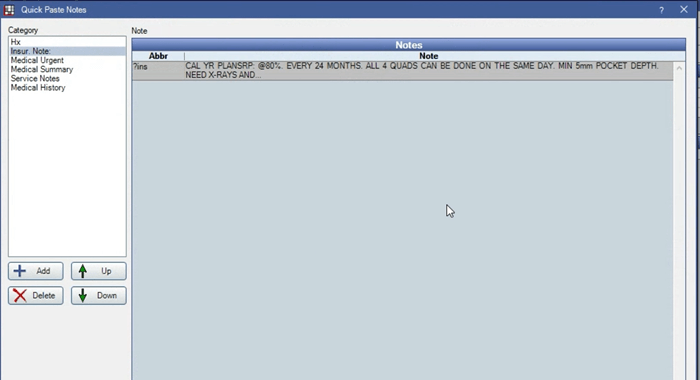
And automatically the note gets inserted into the plan. Note this is basically information that I want included for all patients in their family insurance file. So anyone can have quick access to it.
Now, there is another shortcut to adding this note, which is even faster.
If I just type in “?ins” – it automatically inserts the note instead of me right clicking and then going to and clicking on “insert quick paste note”. So if you haven’t set it up that way, let me show you where you do that.
You’re going to go to in Open Dental -> Setup -> “Quick Paste Notes”, and then double-click on the note you want to create a shortcut for.
So you could either add it. You could add a new note here. But I’m going to go ahead and go inside the note that I’ve already created. So, for example, here’s the abbreviation.
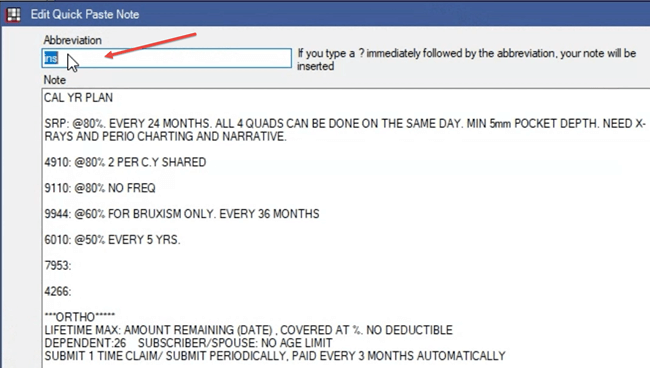
So notice earlier we typed into the Plan Note, a “?ins” – this is the abbreviation. You can make it as short or as long as you want. I say, you keep it short because you want to type less and be fast.
We use the word ins and as soon as they type in “?ins”, it would insert whatever is.
So you can customize lots of notes this way. As you and your team do this insurance verification process on a daily basis, you’ll be able to tweak this process in a way that works for you that may be faster.
And that’s the whole point, just because it works for me, doesn’t mean it’s the best way. It works for me and my team and we’re able to stay efficient without outsourcing this.
If you find additional ways of improving the dental insurance verification process in your practice, I’d love to hear from you.
Leave them in the comments below. If you got any value from this video, don’t forget to subscribe or share this video with your colleagues or friends who may find this helpful. Until next time – take care.