
The design and construction of your dream dental office starts with the three important elements: Your vision, your budget, and the right team.
At this point in your journey of starting your own dental office, you may be coming close to the negotiations of your office lease or you know where you want to build, and you’ve secured or gotten a pre-approval for financing.
If you’re looking for financing, and you’re figuring out where you need to start, then go back to reading the previous post: Dental Practice Startup Loan – What You Need to Know For Financing.
To discuss the construction phase of your startup journey, I’m going to split the posts into a series, so you’re not scrolling down pages and pages on your browser forever.
The first in the series will be the design phase of your office. Prior to having your office space built, the building contractor needs a blueprint of what they’re supposed to build, so they can give you an estimate cost per square foot.
The blueprint can only be made once the architect or the contractor understands what it is that YOU want. With this post, I’m going to help you get started with creating a vision for your office.
In the post following this one, I’ll discuss how to review the first versions of your dental office design drawings or blueprints you receive from your dental contractor / architect.
I’m going to tell you the things you’ll need to consider, so you can maximize the space for efficiency and not waste your hard earned dollars.
For the third post in the series, I’ll talk about the selection of your building contractor. How do you select one? How do you review their bids? I’ll get into the specifics of the build out phase and what you need to watch for to avoid expenses down the line.
In the last post of the construction series, I’ll go back to the design of the office: operatory setup, waiting area, patient entertainment, furnishing the office, etc.
Let’s dive right in to the topic of where you should start when thinking about the design of your dream office!
Download the PDF version of this ENTIRE blog post so you can reference all the valuable content at a later time, or print in a printer-friendly format!
So, this post will help you address the following questions that may come to your mind:
- How many patient operatories do I want?
- What other rooms do I need (Patient consult room, CBCT/x-ray room, a SHOWER?!?!?!
- Who do I need to work with to get started?
Dental Office Design Ideas: Where should I start?
1. Your Vision:
Know what you want – Start by asking yourself the following questions:
- Do you want multiple associates and multiple hygienists working along side in the office? – This will dictate need of a larger administrative as well as clinical staff in your dental office design. To accommodate, you’ll need adequate staff area and restrooms. Multiple doctor office will also dictate a larger waiting room, as well as multiple check-out stations at the front desk.
- Do you see your self getting involved with Digital Dentistry with cone beam Radiology and Cerec? – When you’re starting out, you may not be doing implants – but if you see your self getting heavily involved in larger implant/surgical cases, then you’ll want to consider a room which can house a CT or a Cerec milling machine for one-visit crowns or for fabrication of implant abutments.
- Do you see your self offering seminars / courses within your own office? – This is something I wish I had done in my office. But in future if you plan on hosting study clubs or seminars in your office – plan on allocating appropriate space for this to accommodate your attendees and to house the right technology needed (screen, projector, etc.)
2. Your Team:
When it comes to the construction of your office, your team is going to include an architect (to design and provide official signed blueprint plans for the build out), a building contractor (to build the office), and a dental equipment company.
There are options when working with the right team.
There are separate office design/architectural firms who will help with ONLY the design of your office and provide you with official architectural drawings of your office. You will need these to get building permits for your office.
When working with such firms, they can make recommendations on few names of building contractors who they’ve worked with.
There are companies that provide all-inclusive services: Design, build-out and equipment. The two big names: Henry Schein and Patterson Dental are examples. This option is the most convenient of them all, but also can be the most expensive.
When they design their plans for you, they’ll ask you about the kind of practice you want and how much sqft of space you have. Depending on that, they’ll provide you with a preliminary design.
There’s also another option where you can work with smaller independent dental equipment companies, who will also create an office plan. But you still need an architect to sign off on it to make them official.
If you go this route, the companies usually have architects they work with on a regular basis, so you don’t have to worry about finding one on your own. The same equipment company can also recommend builders who they’re worked with.
Should I go with an all-inclusive company that will provide all the services from start to finish? Or should I find separate vendors for all services? – ie. an architect, a building contractor, dental equipment company, etc.
There is no right or wrong answer here. It all depends on how much time you’re willing to put in. For instance, most dental equipment companies will take care of the cabinetry that you’ll need throughout your office along with providing patient chairs and the rest of dental equipment to start seeing patients.
Going this route will surely be expensive. But,what’s the alternative? The alternative is to find a vendor that will provide cabinetry only, preferably, a NON-dental specific vendor.
I will go into detail on cabinetry and options you have to choose from besides what your dental equipment company tells you. I’ll discuss how I chose not to go along with recommendations made by my dental supply company. I’m also going to tell you about the mistakes I made that cost me **it load of money. But let’s save this for the future post, so stay tuned.
3. Brainstorm:
Having your available sqft space in mind, think of how many operatories you’d like to have. To start, for one operatory, set aside 300 sqft.
So in a 2100 sqft facility, you can have 7 operatories. (2100/7). This number is not set in stone. This does not mean that each operatory is 300 sqft in area. It also includes space for waiting area, restrooms, consultation room, manager’s office, small lab, etc.
If you wanted a larger waiting area, a larger lab or consultation room, it may reduce the number of operatories.
To get an idea of how a design looks on paper or even a 3D simuation, head over to Patterson Dental’s website at https://www.pattersondental.com/Services/Office-Design.
Click on the Design Inspiration section of the website and look around. Start thinking and visualize your office space and see how you would like to have patients flow through your office – from check-in, to operatory, to a consultation room, then to a check-out station.
Virtually design your office online: Here’s a link to Henry Schein’s design services website: http://henryscheinofficedesign.com. Click on “Launch Space Planner” button at the bottom of the page, and you’ll be taken to another website.

Open an example dental office design floor plan from the Henry Schein Gallery by selecting the size in sqft closest to your office, and click on “Open this plan”
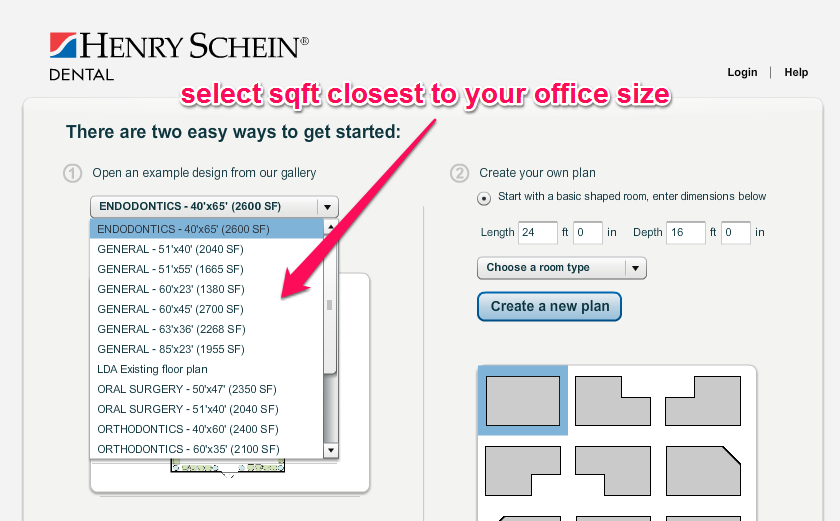
Once you select a plan, click “Open this plan”, which opens a following window:

You can move/add/delete any elements on the design. Play around with this and move rooms around, but you don’t have to get your design exact. This will take you forever. It’s easier to call them up and request a design for what you want.
You may not decide to use Henry Schein’s or Patterson Dental’s services, but at least you have something to start with.
Dental Delivery Systems and its role in Dental Office Design:
If you’ve worked as an associate, you may already be used to working in a certain configuration when it comes to the location of the delivery-system in relation to the patient. There are multiple options in this as well . Take a look at the pictures below for most commonly found configurations.
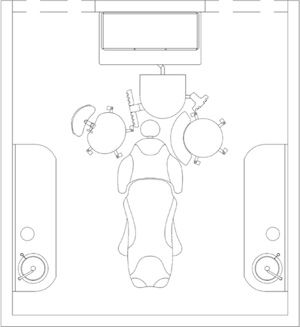
Rear Delivery System – Hand-pieces and all instruments are BEHIND the patient
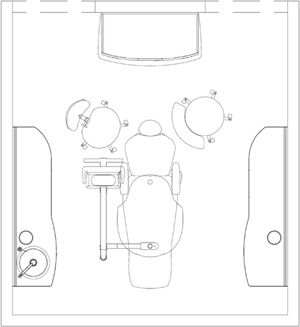
Over the Patient Delivery System – Hand-pieces and all instruments are visible to the patient right in front of them
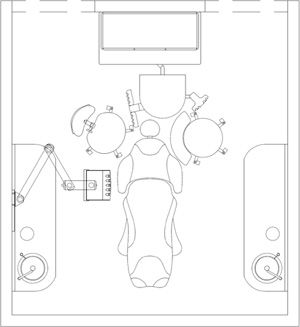
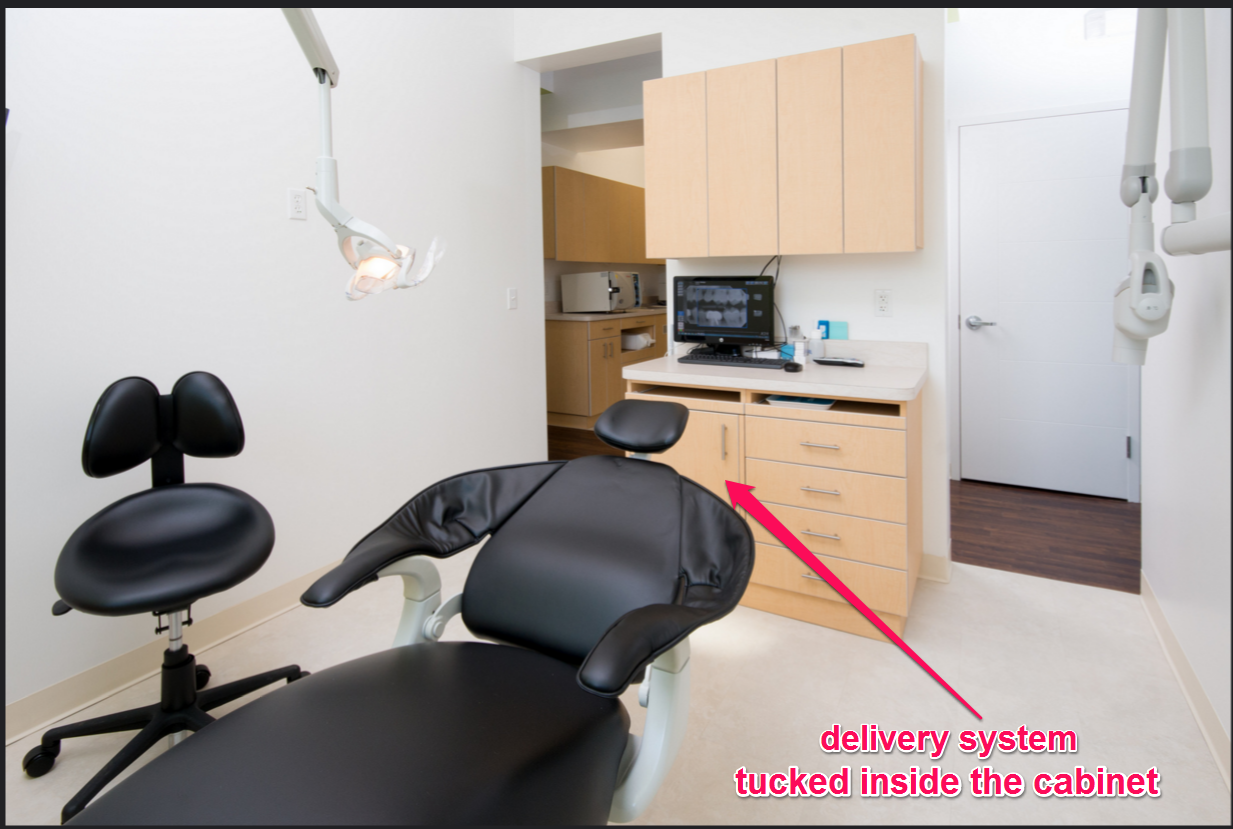
Side Delivery System – Hand-pieces and instruments can be tucked away under a counter off of a side wall
When doing the preliminary design or sketch of your office, you’ll have to decide the configuration because it’s going to determine the plumbing configuration for the operatories.
Here’s Why I use Rear Delivery:
1. Less clutter:
- My goal from the beginning was to have as much space in the room as possible by getting rid of clutter. Working in other offices, I found all patient rooms were filled with unnecessary crap – overstocked inventory (wasted $$) in the countless number of drawers in the totally outdated and poorly designed cabinetry (expensive!).
- With no cabinetry on the right or left wall of the operatory, patient room is free from clutter
- Patient can easily get in and out of the chair
Here’s a picture of one of my operatories:
2. Make the patient less nervous:
I did not want any dental instruments in direct vision of the patient. Most patients tend to be nervous – why add to it by putting your syringe and needles on the bracket right where they can see it in front of them.
3. Maximize space usage:
- Having the hand-piece delivery system under a counter behind the patient allowed for placement of inexpensive storage systems above
- I avoid the redundant and expensive cabinetry on BOTH sides of the walls as you see in the picture below.
- Got rid of the Cuspidor – So, the plumbing is configured to the rear delivery system. See the picture below.

Which Dental Delivery System should I choose?
That answer depends on you. Think about what you’re used to. If you’re comfortable working the way you’ve been working, then stick to it.
To try out a configuration you haven’t tried before, you can contact a dental equipment company showroom, where you can actually try out the different setups.
The following companies have Equipment showrooms:
- Benco Dental (https://www.benco.com/services/equipment/)
- Midwest Dental (http://www.mwdental.com/about-mwd.html)
- Pemco – Newark Dental (http://www.newarkdentalpemco.com/content/22-custom-cabinets-showroom-gallery)
- Ritter Dental (https://www.ritterdentalusa.com/en/about-us/showroom)
Here’s what I did for my dental office design sketch keeping the following goals in mind:
When I sat down to think about my vision for what I wanted, here’s a list I made on a piece of paper:
- Maximize # of operatories for the space
- Must have following rooms:
- Consultation room to discuss treatment plan / financing
- Staff / kitchen area
- Pano / CT room
- Two bathrooms (staff + patients)
- Office manager room (with a door that opens to the front desk area, but allows privacy)
- Small IT closet with stacked arrangement to house Routers, switch, Server
- Small mechanical room with stacked arrangement of Compressor and Vacuum pumps
- Minimize Closets / storage
- Don’t need a grand front reception area
- High Ceilings – If your space allows, having narrower ops with high ceilings will allow a much more “open” feel
Here’s what you should do next when getting started for your preliminary design:
- Make a list of all things you want in your office. Don’t leave anything out. Whatever you think of, just put it down on paper.
- Sketch your design on a piece of paper. Imagine the patient flow through the office. Look at some examples of office designs from links I discussed above. Try to include as many things from your list you made in step 1. (optional)
- Contact the companies I’ve listed above and mention you’re interested in getting a preliminary design for your office. They will ask you for things you’re looking for and the available square footage of your office space. If you made a sketch in step 2, then let them know you have some idea of what you’re looking for.
- Don’t worry about being wrong, let the pros get back to you with a properly designed version of your own sketch you made in step 2.
- Make as many revisions you’d like, and go back and forth with them. You’re not committing to anything at this point.
- Companies will usually waive the fee for designing as long as you move forward with them in purchasing some equipment also (patient chairs, delivery systems, etc.)
- When reviewing / revising your dental office design, you’ll want to refer to our next post on reviewing your first design floor plans or blueprints, so stay tuned in!
Some closing remarks…
Start early. It’s important to make a written list of what you want in your dream office. I’m not talking about a million-dollar dream office, but at least the essentials. If you’ve associated at other offices for a while, you may have already thought about what you DON’T and DO want in your office.
Don’t wait to have your lease finally signed to start the design phase of your office space. Even if your lease space negotiations fall through and you have to find another place, you’ve only lost time. Move onto the second location, and change your design to fit the new space.
As I’ve discussed in my posts before, the reason why you don’t wait is because soon as you’ve signed off on the lease – you should get the final plans signed by your architect and get all the necessary documentation together to get it over to the building department to start your building permit application ASAP.
Everything I’ve discussed in this post regarding the design phase of your office, should take approximately 2-3 weeks including all revisions back and forth. If you know what you want, you can do these revisions within a week – but that depends on the availability of your team.
If you wait to do everything I’ve discussed in this post until after signing the lease, then you waste at least a month before moving forward with the permit application.
Let me know how your design phase is going!
Feel free to comment below if you have questions.
Best of luck and continue to tune in!